Monstera Plant Propagation
Propagating a Monstera plant is a rewarding way to expand your collection. Here, we discuss how to properly prepare for propagation and the techniques you can use for cutting.
Preparing for Propagation
-
When preparing to take Monstera plant cuttings, it’s crucial to use a sharp knife or shears. Make sure these tools are clean to prevent contamination of both the parent plant and the cuttings. Cleaning the cutting tools with soap and water, or even rubbing alcohol, is recommended (Carmeon Hamilton).
-
Take cuttings by making precise cuts directly below a node or an aerial root. Cut each leaf and node into individual segments, ensuring that each leaf has an attached node or aerial root for successful propagation.
-
You can opt to take multiple small cuttings, each with 1-2 leaves and nodes, or a single full cutting with 4-5 leaves and nodes on one vine. In a detailed example by Carmeon Hamilton, an individual chose to take a more extended cutting, resulting in a vine with 6 leaves and 6 nodes/aerial roots.
| Cutting Option | Number of Leaves | Number of Nodes |
|---|---|---|
| Small Cuttings | 1-2 | 1-2 |
| Full Cutting | 4-5 | 4-5 |
Cutting Techniques
-
Monsteras can be propagated by creating either multiple small cuttings or one extended vine cutting. The first technique involves cutting several small segments, each with 1-2 leaves and corresponding nodes. The second technique involves taking a more extended vine cutting, generally with 4-5 leaves and nodes.
-
Always make cuts directly below a node or an aerial root to ensure each cutting has the potential for successful root growth. Proper preparation is key to a successful propagation process (Carmeon Hamilton).
For further guidance on taking care of your propagated plants, you can visit our article on Monstera plant care. Additionally, if you need tips on repotting or growing environments, check out our repotting guidance section.
Water Propagation Process
One effective method for propagating a Monstera plant is through water propagation. This process involves healing the cuttings, propagating them in water, and eventually transferring them to soil. Follow these steps to ensure successful propagation:
Healing the Cuttings
To begin, it’s important to properly prepare and heal the Monstera cuttings (Carmeon Hamilton):
- Use a sharp, clean knife or shears to make the cuts, ensuring you cut directly below a node or aerial root.
- Each cutting should ideally have a vine length of 6 leaves and 6 nodes/aerial roots, as this increases the chances of successful propagation.
- Allow the cuttings to air dry and heal for a few hours before placing them in water. This helps to prevent rot and ensures healthier growth.
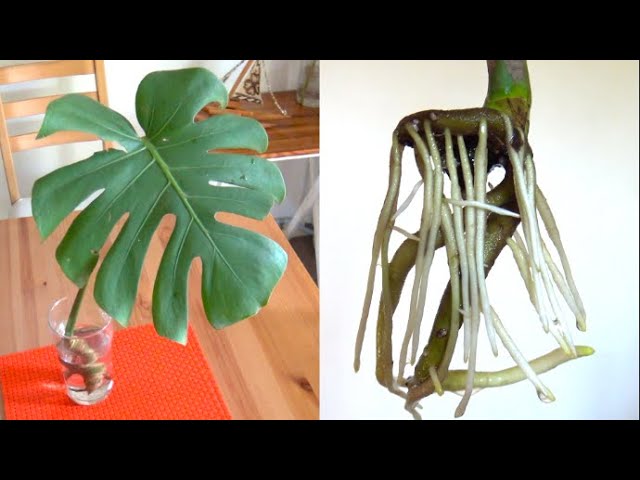
Propagation in Water
Once the cuttings have healed, the next step is water propagation:
- Place the cuttings in a clean container filled with water. Ensure that the nodes or aerial roots are fully submerged while the leaves remain above water.
- Change the water every 3-5 days to prevent stagnation and to provide fresh nutrients for the developing roots.
- Position the container in a bright, indirect light spot to promote optimal growth (Tea Break Gardener).
Over the course of about three months, the cuttings will develop new roots and leaves (Carmeon Hamilton).
Table of Water Propagation Time Frame:
| Week | Activity |
|---|---|
| 1-4 | Initial root development |
| 5-8 | Further root growth and leaf emergence |
| 9-12 | New roots and leaves fully developed |
Transferring to Soil
After approximately three months of water propagation, it’s time to transfer the cuttings to soil:
- Prepare a suitable pot with well-draining soil. Check out our monstera plant pot size guide for the best pot types.
- Gently remove the cuttings from the water, taking care not to damage the new roots.
- Plant the cutting in the soil, ensuring the roots are adequately covered and the stem is supported.
- Water the soil thoroughly after planting and then maintain regular watering schedules, which you can find in our monstera plant watering guide.
This transfer ensures that the propagated cuttings establish themselves well in their new environment and continue to thrive. For more tips on successfully transferring your cuttings, visit our monstera plant repotting article.
By following these steps, you can successfully propagate a Monstera plant from cuttings through water, providing you with cost-effective and healthy new plants. For more information on how to care for Monstera plants, visit our monstera plant care page.
Care Tips for Monstera Plants
Caring for a Monstera plant involves understanding its specific requirements to ensure healthy growth. From suitable environments to watering needs, these tips will help you maintain a thriving Monstera.
Suitable Environments
Monsteras are relatively easy to maintain, making them ideal for beginners. They thrive in environments with medium to bright indirect light but can tolerate lower light conditions. However, low light can result in slower growth and less vibrant leaves. It’s crucial to keep Monsteras away from too much direct sunlight to prevent leaf scorching. These plants love environments that mimic their native tropical habitats.
For additional insights on light requirements, visit our article on monstera plant light requirements.
Watering and Soil
Monsteras do not need special soil. They can be potted in regular indoor potting mix like Miracle-Gro, as long as the pot has good drainage.
Proper watering is key to maintaining a healthy Monstera. It’s essential to water the plant when the top inch of the soil feels dry. Overwatering can lead to root rot, while underwatering can cause the leaves to wilt and turn yellow. For detailed advice, refer to our section on monstera plant watering.
| Factor | Ideal Condition |
|---|---|
| Light | Medium to bright indirect light |
| Soil | Regular indoor potting mix with good drainage |
| Watering | When top inch of soil is dry |
Growth Characteristics
Monsteras are known for their unique leaf patterns. In their natural habitats, Monstera leaves develop holes to allow more sunlight and rain to pass through. This characteristic can be quite pronounced in well-cared-for plants.
These plants can grow quite large and require support as they mature. Providing a monstera plant support pole can help manage their size and shape. It’s also beneficial to regularly prune and trim your Monstera to encourage new growth and maintain its desired form. For more pruning tips, see monstera plant pruning.
Understanding the growth characteristics, alongside proper care, ensures that your Monstera plant remains healthy and vibrant. For more information on their growth patterns, explore monstera plant growth.
Propagation Methods
Monstera plants can be propagated using various methods, each having its own merits. Understanding how to effectively propagate these plants can ensure healthy growth and expansion of your indoor jungle. Here are the key methods to consider:
Stem Cuttings
Propagation through stem cuttings is a popular and straightforward method for growing new Monstera plants. Stem cuttings should include a node, the point where a leaf develops on the stem, to ensure new growth. Cuttings that lack a node and an axillary bud will not produce new growth and are prone to rot.
Steps for Stem Cuttings:
- Select a Healthy Stem: Ensure the stem has at least one node and a healthy leaf.
- Cut Below the Node: Use clean scissors or pruning shears to make a cut just below the node.
- Optional: Use Rooting Hormone: Dip the cut end in rooting hormone to encourage root growth.
- Place in Water: Submerge the cut end in water, ensuring the node is underwater (Explore Water Propagation).
- Maintain Moisture: Keep the water fresh and place the cutting in a bright, indirect light location.
- Transplant to Soil: Once roots develop, transfer the cutting to a pot with well-draining soil.
Air Layering
Air layering is another effective method for monstera plant propagation. This technique involves encouraging root growth while the stem is still attached to the parent plant. It’s particularly useful for larger plants or mature stems.
Steps for Air Layering:
- Select a Healthy Stem: Choose a stem with a node.
- Create a Slight Wound: Make a shallow cut around the node area.
- Apply Moist Sphagnum Moss: Wrap moist sphagnum moss around the wound.
- Secure with Plastic: Cover the moss with plastic wrap to retain moisture, securing it with ties.
- Wait for Roots to Form: Within a few weeks, roots should begin to grow in the moss.
- Cut and Plant: Once roots are well-developed, cut below the root mass and plant in soil.
Division
Division is useful for older monstera plants that have developed several stems or clusters. It’s a simple way to create multiple new plants from an existing one.
Steps for Division:
- Remove the Plant from its Pot: Gently remove the Monstera from its pot to access the root ball.
- Identify Natural Divisions: Look for natural divisions or clusters of stems that can be separated.
- Separate the Clusters: Using clean tools, carefully separate the clusters, ensuring each division has roots attached.
- Repot Each Division: Plant each division in a new pot with well-draining soil.
| Propagation Method | Success Rate | Required Tools | Time to Root |
|---|---|---|---|
| Stem Cuttings | High | Scissors, Rooting Hormone (optional) | 2-4 weeks |
| Air Layering | Medium | Knife, Sphagnum Moss, Plastic Wrap | 4-8 weeks |
| Division | High | Hands/Pruning Tools | Immediate |
By exploring these propagation methods, you’ll gain the skills needed to multiply your Monstera plants efficiently. For additional tips and guidance, refer to our articles on monstera plant care and monstera plant growth.
Additional Propagation Tips
Rooting Hormone Usage
Using rooting hormone powder can enhance the rooting process and promote dense root growth in Monstera plant cuttings. Rooting hormone stimulates rooting, shooting, and blooming when propagating plants. A small amount of rooting hormone powder applied to the cutting’s base can significantly increase the chances of successful propagation.
| Rooting Hormone | Benefits |
|---|---|
| Powder | Promotes fast rooting, dense root growth |
| Gel | Easy application, reduces the risk of overuse |
For more detailed guides, visit our article on monstera plant propagation.
Containers for Growth
The selection of proper containers for your Monstera cuttings is essential for successful rooting. Monstera plants thrive well in containers that can maintain moisture, support the cutting, and provide adequate drainage to prevent rotting. Options include ceramic, plastic, or resin pots (University of Minnesota Extension). It’s important to ensure that the pot has drainage holes.
| Container Type | Features | Drainage |
|---|---|---|
| Ceramic | Aesthetic, retains moisture | Good |
| Plastic | Lightweight, affordable | Excellent |
| Resin | Durable, retains moisture | Good |
For proper pot selection, see our article on monstera plant pot.
Repotting Guidance
Repotting Monstera plants should be done in late winter or early spring, approximately every one to two years. Selecting the right container size is crucial: it should be about two inches wider and one to two inches taller than the current container.
| Time to Repot | Pot Size Increase |
|---|---|
| Late Winter/Early Spring | 2 inches wider, 1-2 inches taller |
For in-depth repotting techniques, visit our guide on monstera plant repotting.
By following these tips, you can ensure the successful propagation and healthy growth of your Monstera plants. For more information on caring for Monstera plants, check out our articles on monstera plant care and monstera plant growth.
Unique Characteristics of Monstera Plants
Monstera plants, often recognized for their captivating foliage, have several distinctive characteristics that make them a favorite among indoor plant enthusiasts.
Plant Origins
Monstera plants, specifically Monstera deliciosa, originate from the tropical regions of South America. These lush environments are well-suited to their growth requirements. In their native habitats, Monsteras thrive in humid and warm conditions, making them highly adaptable to centrally heated home environments.
Variegated Varieties
Variegated Monstera plants feature variations in leaf color, creating a striking blend of green and white patterns. These variations occur due to a genetic mutation causing patches of white or cream on the usually green leaves. Variegated Monsteras are highly sought after and can be pricier due to their unique appearance and limited availability.
| Monstera Variety | Characteristics |
|---|---|
| Monstera Deliciosa | Common, green leaves with holes |
| Monstera Albo Variegata | White patches on leaves |
| Monstera Thai Constellation | Creamy white variegation |
Growth Patterns
Monstera deliciosa, in particular, is known for its vining growth habit. In the wild, these plants can climb tree limbs and trunks with the help of their aerial roots, which attach themselves firmly. A mature Monstera plant can reach lengths of more than 50 feet.
The leaves of Monstera deliciosa are another standout feature. The young plants start with whole, heart-shaped leaves and as they mature, these leaves develop distinctive perforations and deep lobes, often referred to as “fenestrations”. This change in leaf structure helps the plant withstand strong winds and allows sunlight to reach lower leaves.
Monsteras rarely flower or fruit when kept as houseplants due to insufficient humidity levels indoors (University of Minnesota Extension). However, in their natural habitat, Monstera plants produce a flower consisting of a white spike and a sheath, which can transform into a unique fruit.
For more details about how to care for these fascinating plants, including proper monstera plant care, and understanding their growth characteristics, explore our detailed guides.