Propagating Lavender Plants
Methods of Propagation
Growing new lavender plants can be a fun little gardening project, and there are a few ways you can go about it. Whether you’re trying your hand at snipping, splitting, or going from scratch, you’ve got options.
-
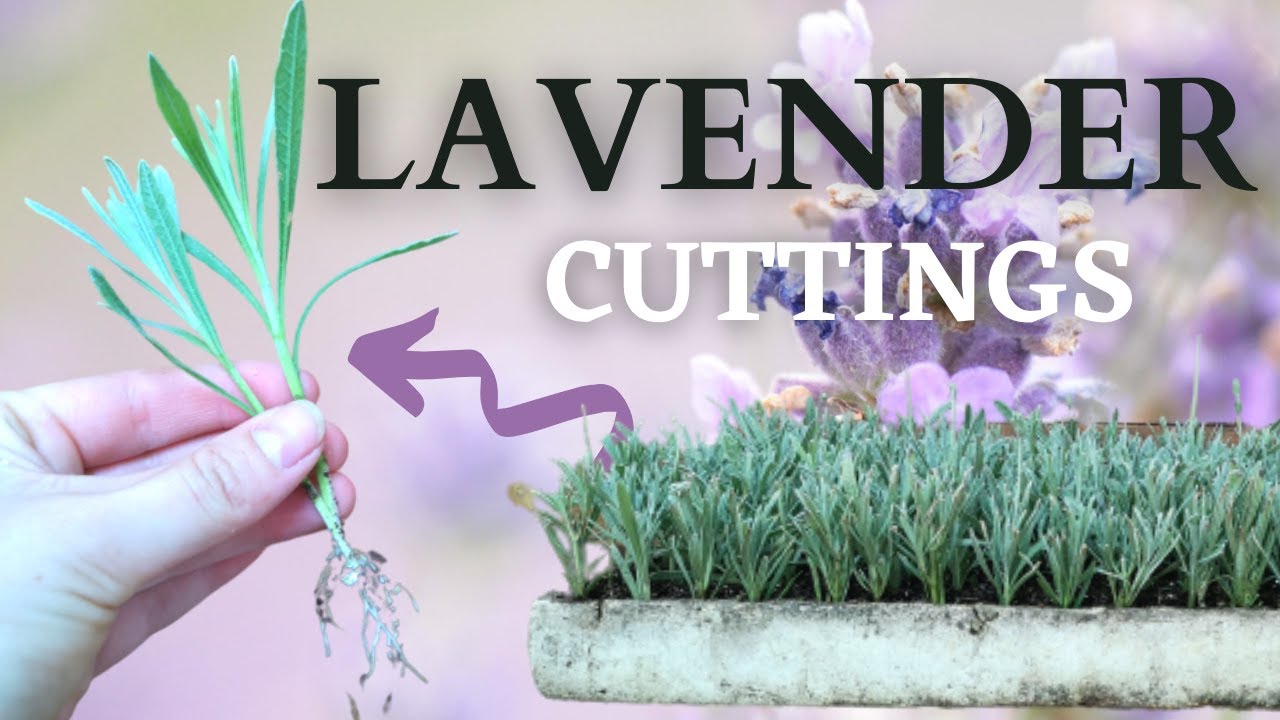
Cuttings: Snip a little softwood from your plant, yank off those lower leaves, and pop it in some good soil. This way is usually quicker than seeds and not quite as needy. You’ll see roots popping up faster, making this a solid choice to kick off your lavender dreams.
-
Division: For those of you comfortable playing plant surgeon, there’s splitting the plant into parts, each with its own roots and shoots. It’s like giving the plant a haircut, but be kind—it’s a bit stressful for the plant.
-
Seed Propagation: If patience is your thing, start with seeds. This is the slow road but can be just as rewarding if you get the germination right and shower your seedlings with care.
Need more nitty-gritty details? Check out our guides on cuttings, division, and seed growing.
Best Time for Propagation
Here comes the ‘when’ part. Timing is your buddy here, making a big difference in getting those plants all set and thriving.
-
Spring and Late Summer: Got a soft spot for nature whisperers over at Little Lavender Farm? They say spring or late summer is prime time. That way, your plants settle in before winter chills stuff up.
-
Spring to End of Summer: Something about the Northern Utah vibes, says Nico and Nat at PBS Utah. They reckon between late spring and end-of-summer is your window for planting bigger lavender plants, especially ones with woody stems.
-
Spring or Summer: The Spruce mentions that spring and summer are when cuttings thrive, which naturally leads to less host plant stress.
| Time | Pros |
|---|---|
| Spring | Lets your plant get comfy before winter bites |
| Late Summer | Good for rooting |
| Spring to End of Summer | Northern Utah’s best bet |
You don’t wanna mess with Mother Nature’s schedule, right? For all kinds of dirt on lavender’s seasons and when to plant, check our bits on seasonal characteristics and best planting times.
Propagating Lavender by Cuttings
Getting more lavender plants with cuttings is a hit with folks because the new plants will be exactly like their parent—same color, same smell, the whole shebang (Little Lavender Farm). Let’s get into kinds of cuttings and sprinkling a bit of rooting powder magic on them to up your gardening game.
Softwood Cuttings
Think of softwood cuttings as the young part of the plant, full of energy and springiness. Pluck them from the plant’s fresh tips—they’re all bendy and much simpler to plant than their harder counterparts. Word on the street from PBS Utah Modern Gardener is these guys sprout roots in about two to four weeks.
Steps to Grab Softwood Cuttings:
- Pinch off spry, healthy shoots that aren’t flowering from the parent plant.
- Snip a 3-4 inch piece right below where the leaf meets the stem using clean scissors.
- Strip off the leaves from the bottom, leave a couple up top.
- Dip the cut end into a rooting hormone to speed up rooting.
- Stick the cutting into a pot of soil that water drains well from.
Hardwood Cuttings
Hardwood means business—it’s the mature, tougher parts of the plant. These are usually harvested while your plant takes a break in colder months. They take more time to sprout roots, about four to six weeks, but they’re as sturdy as they come once growing (The Spruce).
Steps to Take Hardwood Cuttings:
- Scout for a stiff, woody branch on the main plant.
- Slice off a 4-6 inch piece with sharp, clean scissors.
- Remove the bottom leaves, leaving some at the top.
- Dip the tip in rooting stuff.
- Place it in some well-drained dirt and go easy on the watering.
Using Rooting Hormone
Rooting hormone gives you a leg-up. It mimics the plant’s own tricks for getting roots to grow, making your propagation efforts much more successful than going it alone (Little Lavender Farm).
How to Apply Rooting Hormone:
- Take out a bit of rooting powder from the container.
- Dab the cut tip of the lavender into the hormone.
- Shake off any extra powder to avoid clumps.
- Pop it into soil as soon as you’ve got it dipped.
Whether you’re going with young and sprightly softwood or reliable hardwood cuttings, pairing them with a rooting hormone gets you a better shot at filling your garden with more lavender. For tips on looking after your plants at home, take a peek at our section on lavender plants maintenance.
Propagating Lavender by Division
Giving new life to your lavender? Dividing those lovely aromatic plants is a smart and straightforward way to do it. It not only perks up old plants but also gives you new ones for your garden. Think of it as a plant 2-for-1 deal! We’re talking about breaking up the roots of a healthy lavender into smaller sections ready to be planted elsewhere. Let’s get right into this handy trick.
Process of Division
Here’s the lowdown on getting your lavender separated and ready to spread its wings:
-
Picking Your Plant: Grab a sturdy, well-grown lavender. Baby plants with tiny roots need not apply.
-
Getting the Ground Ready: Witness your soil like a sponge by watering it up. Moist soil is your friend when you’re digging around these thirsty plants. Dry soil? Problematic. Lavender loves soil that’s nice and airy to drain well (what’s the soil type of a lavender plant).
-
Uprooting Like a Pro: Ease around the plant’s base with your tools. Think of it like a haircut – you want the roots intact and healthy. Lift that whole sucker up with care.
-
The Big Split: Shake off as much dirt as you can. With a trusty knife or some sharp shears, slice the root ball into several little rooty bits. Each should come with its own roots and some green shooty parts.
-
Time to Settle: Pop the new sections in their fresh spots, leaving space for them to stretch out. Give them a good drink and treat them with the kind love you show all your garden darlings. Need more lavender care wisdom? Hop over to lavender plants maintenance.
| Steps | Description |
|---|---|
| 1 | Pick a healthy lavender friend |
| 2 | Moisten the soil |
| 3 | Uproot with delicacy |
| 4 | Gently split the roots |
| 5 | Plant the newbies |
Advantages and Challenges
Perks
-
Breathing New Life: Dividing isn’t just an action – it’s a revival story for older lavender, sparking fresh growth.
-
Double the Fun: Who doesn’t love more plants? A successful split means more lavender without hitting up the garden store.
-
Ready and Waiting: These newbie plants are all set to be plonked into the ground, saving you the fuss of pre-planting prep work.
-
Penny-Pinching: Keep those dollars in your pocket by making more lavender from your existing crop.
Hiccups
-
Oops – Broken Roots Alert: Handle with care. Roughgoing can stress out the plant, slowing down its growth.
-
Nature’s Timing: Time it to the tee – early spring or fall is prime time. Mess with the plant’s mojo and risk uncooperative weather wear-outs.
-
Babysitting Phase: Get ready for some extra TLC in the early days. Newly plopped plants need mama bear caring to get comfy in their new digs. For setting up shop, visit where to plant lavender.
-
Not for Everyone: Not all lavender loves a good splitting. Reliable English lavender is down for it, but daintier species might give you the cold shoulder in favor of other methods (Ali’i Kula Lavender).
Craving more juicy lavender insights? Check out our deep dives on planting French lavender and seed germination tricks for lavender.
Propagating Lavender by Seed
Growing lavender from seeds is a rewarding hobby for folks who love seeing things spring to life right before their eyes. Getting acquainted with what seeds need to sprout and how to take care of those tiny green babies is crucial if you want your lavender to flourish.
Seed Germination Conditions
Lavender seeds don’t just sprout anywhere; they’re a bit particular about their nursery. Here’s what they fancy:
| Condition | Requirement |
|---|---|
| Temperature | Cozy at 65-70°F (18-21°C) |
| Light | Full sun, ideally 6-8 hours daily |
| Soil | Dreams of well-draining, slightly alkaline dirt (pH 6.5-7.5) |
| Moisture | Needs a Goldilocks balance—moist but no soggy feet |
You can start these seeds indoors or toss them directly into the garden. For indoors, the late winter to spring combo works great. If planting outside, wait until Jack Frost has packed his bags—normally by springtime.
To give those seeds a nudge, consider scarifying them by gently sanding or giving them a soak in warm water for a day. Sprinkle those seeds on the soil, give them a light dust covering, and you’re off to the races.
Seedling Care and Growth
After your seeds have broken through, nurturing those little sprouts is the next step. Here’s the game plan:
| Care Aspect | Requirement |
|---|---|
| Light | Put them in the sunniest spot or under grow lights |
| Watering | Keep soil damp, but save the flood for another day |
| Transplanting | When they’ve got a couple of sets of true leaves, move them to bigger digs or outside |
Always ensure your seedlings get their daily dose of sun and are tucked away from bad weather. Keeping the soil just right—not too dry or too wet—is essential. Slowly introduce them to the outside world to prep them for moving day when you transplant.
Curious about more planting tricks? Check out our guide on the best time to plant lavender and learn what makes up the ideal soil for lavender plants.
Taking good care of your lavender seedlings sets the stage for robust plants that flourish. For tips on sprucing up your lavender from cuttings or getting them ready for the cold with winterizing tips, dive into our other helpful pages.
Tips for Successful Propagation
Growing lavender is like baking the perfect pie—get the basics right, and you’ll have a fragrant result that everyone will love. The secret ingredients here are your soil and timing. Nailing these will make sure your lavender not just survives but flaunts its fragrant blooms like a boss.
Suitable Soil Drainage
To start, your lavender loves the dry and sunny life. It’s like that friend who’s always hanging out at the beach needing that right sandy vibe underfoot. Without it, you risk your lavender drowning in soggy regret. Here’s how to get it right:
- Soil Preference: Sandy or loamy, please! These types are the ideal sandcastles for lavender roots, unlike the stodgy clay that keeps water locked up tighter than a gym schedule. For more on that, peek at lavender soil preferences.
- Boosting Nutrients: Mix in the good stuff like compost or old manure. This helps the water slide right through, making sure your lavender stays dry and happy.
- Perfect Spot: Look for a space with plenty of breeze and sunshine. It’s like picking the sunniest spot in the park but for plants. Think of it as your lavender sunbathing—just check out great spots for lavender planting for more tips.
| Soil Type | Drainage Quality | Your Move |
|---|---|---|
| Sandy | Spot on | Lavender HQ! |
| Loamy | Pretty Good | Spruce it up a little |
| Clay | Nope | Overhaul needed! |
Understanding your soil saves you heartache later and keeps your blooms bright and perky.
Ideal Planting Times
Timing’s everything—like catching the bus just as it rolls up. Plant your cuttings when the sun’s warming things up, say spring or later summer. This gives your baby plants time to grow some roots and show the cooler months who’s boss.
| Propagation Method | Prime Time | Perks |
|---|---|---|
| Cuttings | Spring, Late Summer | Quick rooting, less stress on mummy plant |
| Division | Spring, Summer | Gives time to spread |
| Seed | Spring | Ideal for germination magic |
If you live somewhere cooler like Northern Utah, mark your calendars for late spring to summer’s end (Utah Lavender Guide). And for those of you hankering after details on the types of lavender and when to set them free outside, head over to lavender season details.
Do your lavender right by following these tips, and it’ll reward you with a flourishing display—bathed in that unmistakable fragrant touch lavender fans live for.
For more nuggets of botanical wisdom, check out our handy guides on looking after lavender and optimal lavender planting timing.
Growing Lavender from Propagated Cuttings
Growing lavender from cuttings is a great way to fill your garden with these fragrant beauties. Knowing the basics of rooting and taking care of new plants can make this process a breeze—even if you’ve got a black thumb.
Root Development
When it comes to getting those roots sproutin’, lavender cuttings can act a little differently based on the type of cutting. If you’re using softwood cuttings—those fresh, bendy bits from new growth—they normally take about two to four weeks to start showing roots. Hardwood cuttings, the tougher guys cut in fall or winter, might need four to six weeks to get going (The Spruce).
The magic happens at the heel of the cutting, where roots typically form. If there’s no heel, just snip below a leaf joint to give those roots a nudge. Some folks like to use rooting hormone for an extra boost, but that’s totally optional (Gardeners’ World).
| Type of Cutting | Rooting Time |
|---|---|
| Softwood | 2-4 weeks |
| Hardwood | 4-6 weeks |
Once your roots make an appearance, usually by late summer, it’s time to find these little plants a new home. You can either transplant them straight to the garden or let them chill in pots until spring (Sara Bäckmo).
Care and Maintenance
After rooting, keeping lavender happy is all about good care. Here’s the scoop on what they need:
-
Watering: These plants are not fans of soggy feet, so let the soil dry a bit between waterings. If you’re unsure about when to water, swing by our page on lavender’s water needs.
-
Soil: Lavender loves well-draining, slightly alkaline soil. Anything else might lead to a sad, droopy plant. Curious about soil specifics? Check out our page on lavender soil preferences.
-
Sunlight: More sun equals happier lavender. Aim for at least six hours of rays a day. Need tips on placement? Read our article on where to plant lavender.
-
Pruning: Trim ’em up after flowering to keep them in shape but steer clear of the woodiest parts. More on that in our guide about pruning lavender.
-
Protection from Pests and Diseases: Lavender doesn’t usually worry too much about pests, but wet conditions can invite fungus. Good air flow around your plants helps shoo those nasties away.
Stick to these easy steps, and your propagated lavender cuttings will turn into strong, aromatic plants. Bask in the glory of your lavender haven all year long!


