Understanding Peace Lily Leaf Issues
Impact of Low Humidity
Peace lilies, originating from tropical regions such as Colombia and Venezuela, thrive in environments with high humidity (Garden Ninja). When the air becomes too dry, these plants struggle to absorb moisture through their roots and release it through their leaves. This scenario often leads to brown and crispy leaf edges and drooping leaves. Low humidity can also make the plant more susceptible to pest infestations, such as spider mites.
| Humidity Level | Impact on Peace Lily |
|---|---|
| High (60-80%) | Optimal growth, healthy leaves |
| Moderate (40-60%) | Adequate growth but possible minor leaf browning |
| Low (<40%) | Brown, crispy edges, drooping leaves, susceptibility to pests |
Symptoms of Inadequate Humidity
Peace lilies exhibit several clear signs when they are not receiving enough humidity, which can significantly impact their health. Recognizing these symptoms early is key to providing the necessary care:
- Wilted or drooping leaves, indicating stress due to dry conditions.
- Browning leaf tips or edges, common in low-humidity environments.
- Slowed or stunted growth, revealing prolonged exposure to suboptimal humidity levels.
To alleviate these symptoms, consider replicating their natural rainforest habitat by maintaining high humidity levels indoors. For more tips on keeping your peace lily healthy, refer to our guides on proper watering techniques and correct light exposure.
Understanding these issues and addressing them promptly can prevent further complications, such as the leaves of your peace lily plant turning black, which often signals more severe underlying problems. For more insights into related issues, check out our article on peace lily plant leaves turning brown.
By being aware of the impact of low humidity and its symptoms, gardeners can take informed steps to ensure their peace lilies remain vibrant and healthy.
Dealing with Low Humidity
Low humidity can pose significant challenges for peace lilies, manifesting as browning leaf tips, drooping foliage, and increased susceptibility to pests. To combat these issues, it’s essential to manage humidity levels effectively.
Misting the Leaves
One practical solution to alleviate low humidity for peace lilies is misting their leaves. Misting should be performed two to three times a week, focusing on the foliage. It’s advisable to mist the leaves in the morning to allow them sufficient time to dry before cooler evening temperatures, thus reducing the risk of fungal diseases (Cafe Planta).
| Time of Day | Frequency |
|---|---|
| Morning | 2-3 times a week |
Misting provides immediate relief to the plant’s leaves, helping to maintain their turgidity and reduce the chances of brown, crispy edges.
Importance of Optimal Humidity
Creating an environment with optimal humidity levels is crucial for the well-being of peace lilies. Ideal humidity levels for peace lilies range between 50-60%. When the air becomes too dry, these plants struggle to absorb moisture through their roots and release it through their leaves, leading to visible symptoms like wilted or drooping leaves, browning leaf tips, and slowed growth.
| Symptom | Cause |
|---|---|
| Drooping Leaves | Low Humidity |
| Browning Leaf Tips | Low Humidity |
| Slowed Growth | Low Humidity |
To maintain appropriate humidity levels, investing in a humidifier can greatly benefit peace lilies. A humidifier releases water vapor into the air, raising the overall humidity in your home and providing a more suitable environment for the plants to thrive. Additionally, consider slight underwatering in high-humidity environments to prevent root rot, as peace lilies are susceptible to overwatering (Idyl).
For more information on peace lily care, from repotting to handling diseases, visit our detailed guides. Keeping an eye on humidity levels and making small adjustments can drastically improve the health and vitality of your peace lily plant.
Causes of Peace Lily Leaf Blackening
Peace lilies are popular indoor plants, but they can face several issues that may cause their leaves to turn black. Two primary causes of this problem are improper watering practices and fungal infections.
Overwatering and Underwatering
Overwatering and underwatering are common reasons for peace lily plant leaves turning black. Both conditions can lead to significant root issues. When a peace lily is consistently overwatered, the roots become waterlogged, leading to root rot. This can cause the leaves to become water-soaked and eventually turn black. Additionally, overwatering may result in a foul smell emanating from the potting soil due to root rot. On the other hand, underwatering causes the roots to dry out, which can also lead to blackened leaves.
To prevent these issues, it is crucial to follow proper watering techniques. Over-caring for the plant with excessive activities like misting, feeding, repotting, and overwatering can lead to leaf discoloration. Peace lilies thrive on infrequent care and watering.
Fungal Infections
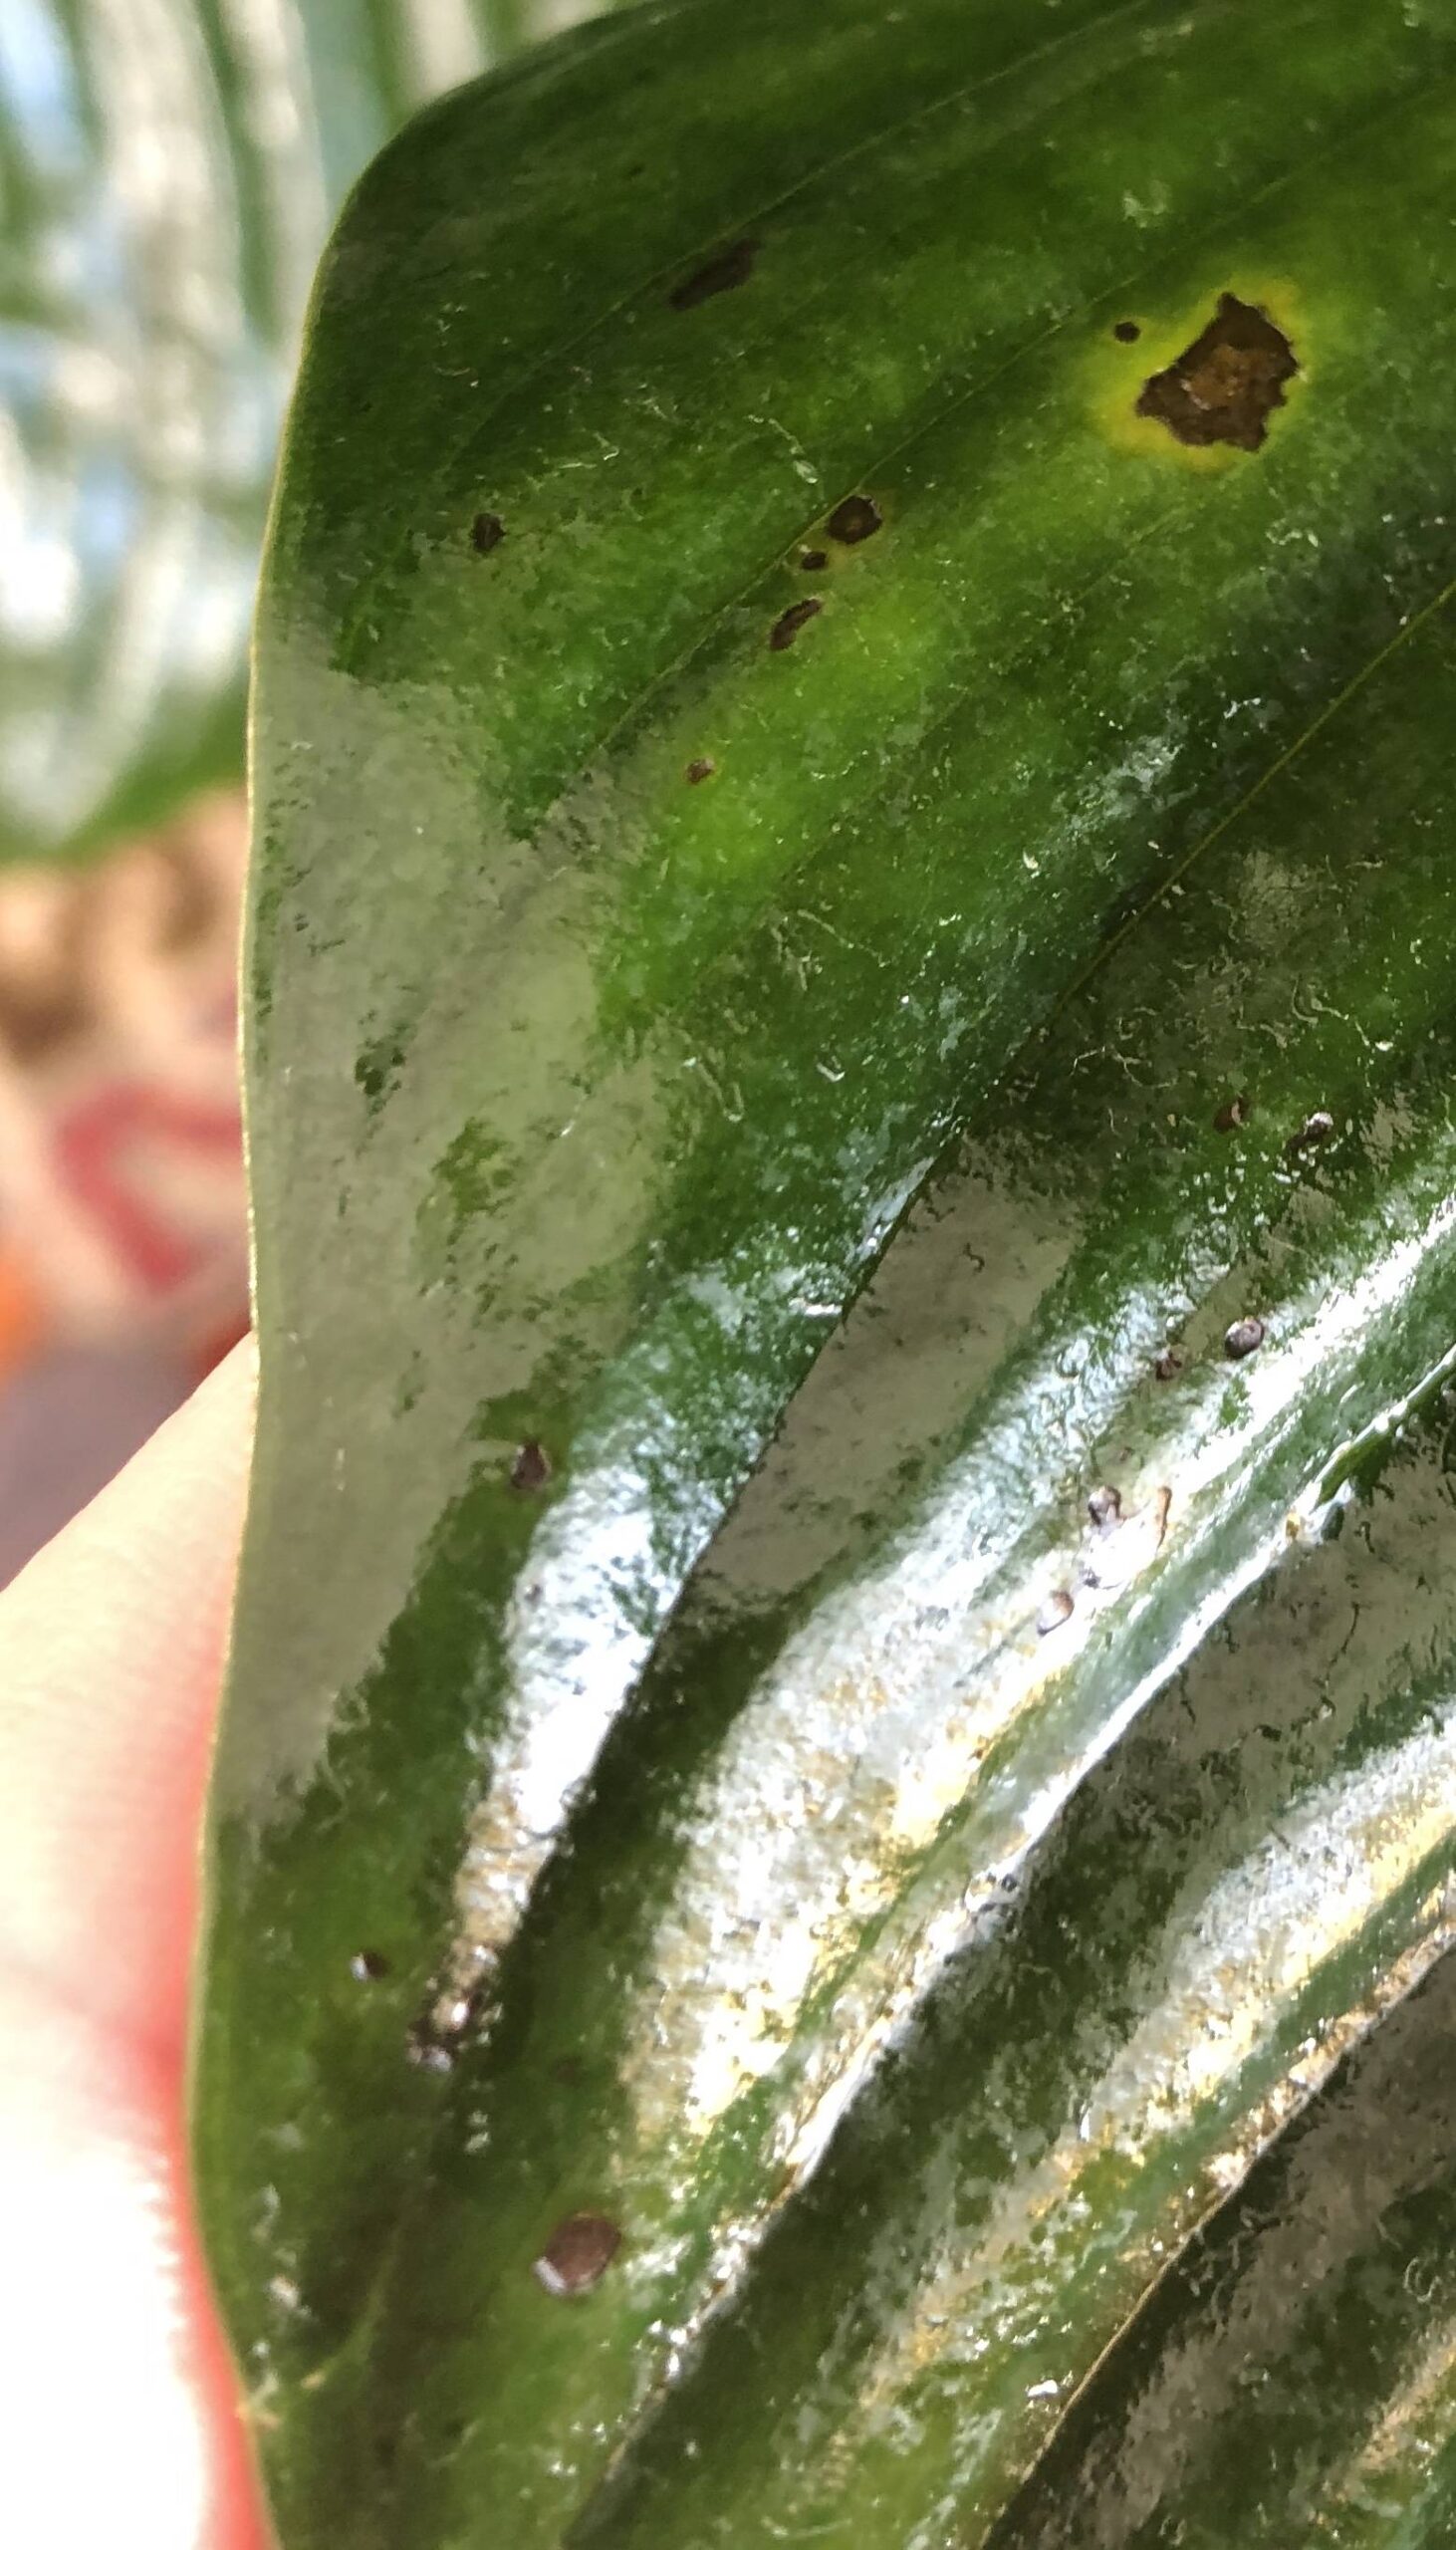
Fungal infections are another significant cause of peace lily leaves turning black. These infections can occur when the plant’s soil remains excessively wet, creating a conducive environment for fungus growth. Symptoms of a fungal infection may include black, water-soaked spots on the leaves, which can spread if not addressed. Overwatering, along with a rich soil composition, can contribute to the development of fungal problems, especially after repotting (Flower Shop Network).
To combat fungal infections, it might be necessary to use an appropriate fungicide. Seeking advice from a local garden center or nursery can help identify suitable products and provide guidance on treatment methods.
| Cause | Effect |
|---|---|
| Overwatering | Root rot, foul smell, black leaves |
| Underwatering | Dry roots, black leaves |
| Fungal Infections | Black, water-soaked spots, potential spread |
Recognizing these issues and addressing them promptly is essential for maintaining the health of your peace lily. Proper watering practices and timely fungal treatments will help prevent the blackening of leaves. For additional guidance, explore our articles on proper watering techniques and preventing fungal diseases in peace lilies.
Solutions for Blackened Leaves
Blackened leaves on peace lilies can be a sign of several underlying issues. Addressing these problems promptly can help to restore the health of your plant. This section focuses on remedying watering issues and addressing fungal infections, two common causes of peace lily plant leaves turning black.
Remedying Watering Issues
Peace lilies are sensitive to both over-watering and under-watering, and finding the right balance is crucial for plant health. Excessive moisture can lead to root rot, while inadequate watering can cause the leaves to wilt and blacken.
| Watering Issue | Symptoms | Solution |
|---|---|---|
| Over-Watering | Yellowing leaves, soggy soil, root rot | Allow the soil to dry out, ensure proper drainage, avoid waterlogging |
| Under-Watering | Drooping leaves, dry soil, blackened edges | Water when the top inch or two of soil is dry, maintain consistent moisture |
Steps to Remedy Watering Issues:
- Check Soil Moisture: Assess the soil moisture by sticking your finger about an inch into the soil. Water the plant if the soil feels dry.
- Ensure Proper Drainage: Use a well-draining potting mix and ensure that the pot has drainage holes to prevent water from accumulating at the bottom.
- Consistent Watering Schedule: Establish a regular watering routine, ensuring that the soil remains consistently moist but not waterlogged. Avoid allowing the soil to dry out completely.
For more specific details on how to care for your peace lily’s watering needs, visit our page on peace lily plant care instructions.
Addressing Fungal Infections
Fungal infections can cause blackened leaves, especially in conditions of high humidity and poor air circulation. Recognizing and treating fungal issues promptly can help prevent further damage to the peace lily.
Signs of Fungal Infections:
- Black or dark brown spots on leaves
- Yellowing or wilting leaves
- Mold or mildew on the soil surface
| Fungal Infection | Symptoms | Treatment |
|---|---|---|
| Leaf Spot | Black or brown spots on leaves | Prune affected leaves, increase air circulation, use fungicide |
| Root Rot | Mushy, black roots, yellowing leaves | Remove affected roots, repot with fresh soil, reduce watering |
Steps to Address Fungal Infections:
- Prune Affected Leaves: Remove any leaves showing signs of fungal infection using sterilized pruning shears. Dispose of the infected leaves properly.
- Improve Air Circulation: Ensure that the plant has good air circulation by spacing it appropriately and not overcrowding with other plants.
- Use Fungicide: Apply an appropriate fungicide to treat the fungal infection. Follow the instructions on the product label for best results.
For continuous protection from fungal infections, maintaining optimal humidity and cleanliness around the plant is vital. Proper air circulation can also deter fungal growth. To learn more about air circulation requirements, refer to our guide on enhancing peace lily health.
By addressing these common issues, you can help restore your peace lily’s health and enjoy vibrant, green foliage. For additional tips on maintaining the overall health of your peace lily, check out resources like proper watering techniques and correct light exposure.
Preventing Peace Lily Leaf Problems
To maintain a healthy peace lily plant and avoid issues such as leaves turning black, it is essential to understand proper watering techniques and ensure the correct light exposure.
Proper Watering Techniques
Peace lilies are sensitive to both over-watering and under-watering. To avoid blackened leaves, water the plant when the top inch or two of soil becomes dry to the touch (Idyl). It’s important to not let the soil completely dry out, as this may cause wilting and stress.
Signs of overwatering, such as yellowing leaves, indicate that the plant has been receiving too much water. Overwatering can lead to root rot, a condition that is often fatal to peace lilies. To prevent this, ensure the plant is in a container with adequate drainage holes and avoid water buildup at the bottom (Backyard Boss).
Underwatering can also cause damage, often resulting in wilted or drooping leaves that curl inwards. Consistent monitoring and adjusting the watering habits can help maintain the plant’s health.
| Watering Issue | Symptoms | Solution |
|---|---|---|
| Overwatering | Yellowing leaves, consistently wet soil, root rot | Allow soil to dry out, ensure good drainage |
| Underwatering | Wilted, drooping leaves, dry soil | Water when top inch of soil is dry |
Use rainwater or filtered tap water to minimize exposure to chlorine, which peace lilies are sensitive to.
Correct Light Exposure
Peace lilies thrive in low to medium light environments but can tolerate fluorescent lighting. Direct sunlight can cause the leaves to burn and turn black, so it’s essential to place the plant in a location with indirect light. A spot near a north or east-facing window is ideal.
For those experiencing issues with both watering and light exposure, a combination of proper care techniques can be highly effective. Ensuring that the peace lily receives the right amount of light and carefully monitoring the soil moisture will contribute to the plant’s overall well-being.
Proper light exposure not only helps maintain healthy leaf coloration but also promotes the growth of peace lily plant flowers. If your peace lily shows signs of distress, consider adjusting its exposure to light in addition to improving your watering habits.
For more information on maintaining a healthy peace lily, you can visit our articles on peace lily plant yellow leaves and peace lily plant brown tips.
Enhancing Peace Lily Health
Creating an ideal environment for your peace lily (Spathiphyllum) can prevent issues like leaves turning black. Two critical factors to consider are optimal humidity levels and proper air circulation.
Ideal Humidity Levels
Peace lilies thrive in high humidity environments, akin to their natural tropical habitats (Garden Ninja). Low humidity can cause their leaves to turn black or brown (Cafe Planta). Ideally, peace lilies perform best in humidity levels between 50% and 60%.
| Humidity Level | Effect on Peace Lily |
|---|---|
| <40% | Leaves may turn black or brown |
| 40% – 50% | Acceptable, but not ideal |
| 50% – 60% | Optimal for healthy growth |
| >60% | Risk of fungal infections if not combined with good air circulation |
Investing in a humidifier can significantly benefit your peace lily by increasing the overall humidity in the home. Misting the leaves regularly and placing the plant on a tray filled with water and pebbles can also help maintain adequate humidity levels.
Air Circulation Requirements
Proper air circulation is crucial in high humidity environments to prevent fungal infections and other moisture-related issues (Idyl). Lack of airflow can cause stagnation, leading to fungal growth and other problems.
To ensure proper air circulation, place your peace lily near a gentle air current, such as a fan or an open window, provided the weather conditions are favorable. Avoid placing the plant in direct drafts or near heating vents, as these can cause stress to the plant.
Properly balancing humidity and air circulation can keep your peace lily plant leaves turning black at bay. For more tips on maintaining the health of your peace lily, check out our guides on peace lily plant fertilizer, peace lily plant care instructions, and peace lily plant pruning.


