Repotting Your Rubber Plant
Signs for Repotting
Identifying when it’s time to repot your rubber plant is crucial for maintaining its health and growth. Here are some common signs that indicate your rubber plant needs repotting:
- Roots Growing Through Drainage Holes: If you notice roots emerging from the bottom of the pot, it’s a clear sign that the plant has outgrown its current container and needs more space.
- Stunted Growth: If your rubber plant is not growing as vigorously as expected, it may be root-bound, limiting its ability to absorb nutrients and water.
- Wilting or Yellowing Leaves: These symptoms can indicate that the roots are crowded, preventing proper nutrient uptake.
- Frequent Watering Needs: If you find yourself watering the plant more frequently, it might be because the current soil volume is insufficient to retain moisture.
- Visible Root Ball: If you remove the plant from its pot and see that the roots are tightly packed into a ball, it’s time to repot.
It’s essential to keep an eye on these indicators to ensure the health and vitality of your rubber plant. For more information on specific issues like rubber plant leaves falling off, visit our detailed guide.
Choosing the Right Pot Size
Selecting the appropriate pot size is vital when repotting your rubber plant. The new pot should provide enough room for the roots to grow without overwhelming the plant. Here are some guidelines to help you choose the right pot size:
- Increase Pot Size Gradually: Move to a pot that is 1-2 inches larger in diameter than the current one. This ensures the plant has enough space to grow without being too large, which can lead to overwatering issues.
- Consider Root Ball Size: Ensure the root ball sits just below the rim of the new pot, leaving space for watering (Gardening Know How).
- Adequate Drainage: Choose pots with drainage holes to prevent waterlogging, which can cause root rot. For more on preventing root issues, read our article on rubber plant root rot.
Here’s a table to help you determine the right pot size:
| Current Pot Size (inches) | Recommended New Pot Size (inches) |
|---|---|
| 4 | 6 |
| 6 | 8 |
| 8 | 10 |
| 10 | 12 |
After selecting the appropriate pot, ensure you follow the correct repotting process, including inspecting and potentially pruning the roots, for optimal results. For additional tips and techniques, visit our section on rubber plant root pruning.
By understanding the signs for repotting and choosing the right pot size, you can ensure your rubber plant thrives. For more detailed care instructions, check out our guides on rubber plant soil mix and rubber plant watering.
Preparing Your Rubber Plant for Repotting
When getting ready for the repotting process, it’s crucial to ensure your rubber plant is well-prepared. This includes inspecting the root system and pruning roots if necessary.
Inspecting the Root System
Before you begin repotting, you will need to remove the rubber plant from its current pot carefully. Ensure you do this gently to avoid damaging the roots. Once the plant is out, it’s time to inspect the root system thoroughly.
- Check for Root-bound Condition: Assess whether the roots are densely packed and circling inside the pot. A root-bound plant indicates the need for repotting.
- Assess Root Health: Look for healthy white or light-colored roots. Diseased roots may appear brown, mushy, or have an unpleasant odor.
| Root Condition | Indicator |
|---|---|
| Healthy Roots | White/Light-colored |
| Diseased Roots | Brown, mushy, malodorous |
Pruning Roots if Necessary
If you find that the roots are too crowded or unhealthy, root pruning may be required before replanting your rubber plant. Here’s how to go about it:
- Untangle Roots: Gently tease out the roots to separate them. This helps to encourage new growth in the fresh soil.
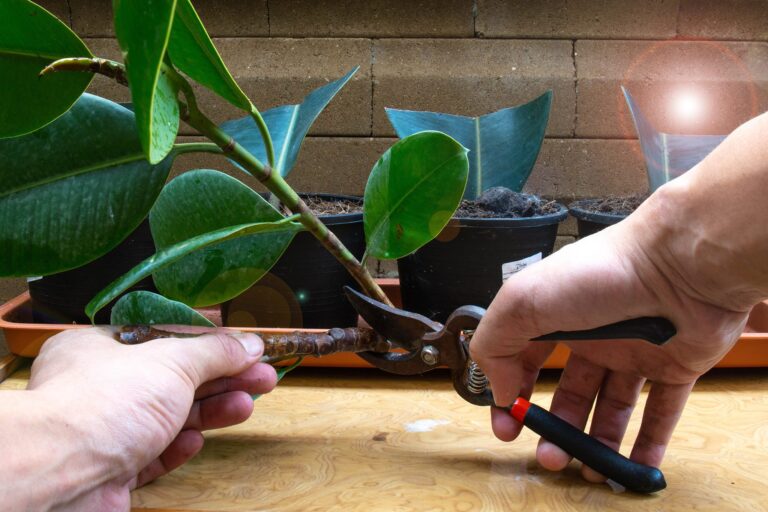
- Trim Damaged Roots: Use clean, sharp scissors or pruning shears to remove any brown, mushy, or rotten roots. Properly disinfect your tools beforehand to avoid contamination (Gardening Know How).
- Reduce Excessive Root Length: If the roots are excessively long, trim them back by about one-third to help the plant establish more effectively in its new pot.
After inspecting and pruning, you are ready to proceed to the actual repotting process. Remember to choose a pot that is only slightly larger than the current one—no more than 2 inches larger in diameter for tabletop pots and no more than 4 inches for floor planters (The Sill).
For more information on soil and drainage, you can check out our detailed guide on rubber plant soil. Proper preparation lays the foundation for a successful repotting, ensuring your rubber plant thrives in its new environment.
Repotting Process
When it comes to repotting your rubber plant, understanding the correct process is essential for ensuring its continued health and growth. The right soil mix and proper drainage play crucial roles in this process.
Proper Soil Mix
Rubber plants thrive best in a good quality peat-based soil mix that drains well and provides plenty of aeration for optimal growth. A well-draining mix prevents water from pooling around the roots, which can lead to root rot. Here is a recommended soil mix for rubber plants:
| Component | Percentage |
|---|---|
| Peat Moss | 40% |
| Perlite | 30% |
| Pine Bark | 20% |
| Compost | 10% |
You can also explore our detailed guide on rubber plant soil mix for more information on creating the perfect blend.
Ensuring Proper Drainage
Proper drainage is critical when repotting your rubber plant. Without it, water can accumulate at the root level, leading to rot and other issues. Follow these steps to ensure your plant has adequate drainage:
- Choose a Pot with Drainage Holes: Select a pot with several drainage holes at the bottom to allow excess water to escape.
- Add a Layer of Gravel or Pebbles: Place a layer of gravel or pebbles at the bottom of the pot before adding soil. This layer helps improve drainage by keeping the soil from blocking the holes.
- Use a Potting Mix with Good Drainage: Incorporate components like perlite and pine bark into your soil mix to enhance drainage and aeration.
For more tips on maintaining proper drainage, visit our article on rubber plant pot size and drainage.
By ensuring you have the proper soil mix and adequate drainage, you can successfully repot your rubber plant and support its vigorous growth. Don’t forget to check our tips on rubber plant watering for post-repotting care.
After Repotting Care
Proper aftercare is crucial to ensure your rubber plant thrives after repotting. This includes correctly planting the rubber plant in its new pot and adhering to appropriate watering practices.
Planting the Rubber Plant
When transferring your rubber plant to its new pot, it is vital to position the root ball correctly. The plant’s root ball should sit just below the rim of the new pot, leaving enough space for watering. Here are detailed steps to follow:
- Positioning the Root Ball: Place the root ball in the center of the new pot, ensuring it is positioned just below the rim.
- Adding Soil: Fill in soil around the root ball, making sure to tamp it down gently to eliminate air pockets. Leave about an inch of space at the top to allow for watering.
- Ensuring Stability: Make sure the plant stands upright and is stable. Adjust the soil around the base of the plant to secure it firmly.
By carefully adjusting the soil and positioning the root ball correctly, you set the stage for a healthy, thriving plant.
Watering Tips
Proper watering is essential after repotting to help your rubber plant settle in its new environment (Joy Us Garden). Follow these tips to keep your plant healthy:
- Initial Watering: Water the plant thoroughly right after repotting to help the soil settle around the roots and to ensure there are no air pockets.
- Frequency: Monitor the plant and let the top inch of soil dry out between watering sessions. Overwatering can lead to issues like root rot. For detailed watering schedules, refer to our guide on rubber plant watering.
| Condition | Watering Frequency |
|---|---|
| Infrequent Light Watering | Every 7-10 days |
| Moderate Watering | Every 5-7 days |
| Frequent Heavy Watering | Every 3-5 days |
It’s also essential to remember that the plant does not need fertilization immediately after repotting. Give it some time to acclimate to the new soil and pot conditions before introducing any fertilizers.
For additional care tips, refer to our articles on rubber plant leaves curling and rubber plant leaves falling off. These resources will guide you through maintaining your plant’s health after repotting.
Troubleshooting After Repotting
Repotting a rubber plant can sometimes lead to stress and other health issues. Here are some common problems and how to address them effectively.
Dealing with Plant Stress
After repotting, your rubber plant may exhibit signs of stress. Common symptoms include drooping leaves and a lack of new growth. It is essential to recognize these signs and take appropriate actions:
-
Drooping Leaves
- Ensure the pot size is appropriate. A container that is more than 2 inches larger than the original can retain too much moisture, potentially leading to root rot. For more on the subject, see rubber plant root rot and rubber plant pot size.
- Water the plant well after repotting but avoid overwatering. Freshly repotted plants do not necessarily need fertilizer (The Sill).
-
Lack of New Growth
- Ensure the plant is getting adequate light. Placing your rubber plant in a location with bright, indirect light can help. For more details on light requirements, visit rubber plant light requirements.
- Keep the plant in a stable environment with proper temperature and humidity levels. Sudden changes in the environment can cause stress.
Addressing Plant Health Issues
After repotting, some rubber plants may experience more serious health problems, such as root rot or pest infestations. Here is how to tackle these issues:
-
Root Rot
- Check the roots if you suspect root rot. Remove the plant from its pot and inspect the root system. Healthy roots should be white or light tan and firm. Cut away any soft, brown, or mushy roots (Kentucky Living).
- Replant the rubber plant in a smaller container with fresh, dry soil mix. Make sure the new pot has proper drainage to avoid excess moisture. For the ideal soil mix, refer to rubber plant soil mix.
-
Pest Infestations
- Inspect your plant regularly for signs of pests such as spider mites or mealybugs. If you notice any, treat the plant with insecticidal soap or neem oil.
- Isolate the infected plant to prevent pests from spreading to other plants. Ensure the plant gets adequate air circulation and avoid overwatering.
By following these troubleshooting tips, you can help ensure your rubber plant remains healthy and thrives after repotting. For additional information on addressing common issues, visit rubber plant diseases and rubber plant leaves falling off.


