ZZ Plant Leaf Propagation
Leaf Propagation Overview
ZZ plant leaf propagation is like creating a mini army of green companions without opening your wallet. You start with a leaf, and before you know it, you’ve got new plants popping up everywhere. No magic spells needed here—just a sprinkle of patience and a bit of care. Choose between water or soil to get those new rhizomes and roots going, ready to jazz up your space with some leafy charm.
Steps for Water Propagation
Dreaming of watching your ZZ leaves sprout roots in water? You’re in luck! Water propagation is simple and lets you keep an eye on things as they progress. Let’s get started:
- Pick the Perfect Leaves:
- Go for leaves that look like they’re in their prime—strong and healthy with no signs of issues. They’re the ones with all the potential.
- Snip and Prepare:
- Gently snip the chosen leaves as close to the main plant as you can, using a clean, sharp tool. Make sure you’re getting the entire leaf with its proud little base.
- Take the Plunge:
- Place your cut leaves in a small container filled with water, just enough to cover the bases. Make sure they’re standing tall and won’t flop over.
- Keep an Eye and Refresh:
- Sit the container where it’ll get plenty of bright but not too harsh light. Change the water every week or so to keep it fresh and clear of any rogue bacteria.
- Hang Tight for Roots:
- In a couple of months, keep an eye out for those exciting little rhizomes and roots popping up. Patience is the name of the game.
| Propagation Step | Estimated Timeframe |
|---|---|
| Pick the Perfect Leaves | Right away |
| Snip and Prepare | About 1-2 minutes/leaf |
| Take the Plunge | Right away |
| Keep an Eye & Refresh | Weekly |
| Hang Tight for Roots | Around 2 months |
- Roots to Soil:
- Once those roots have grown nice and long (about an inch), it’s time to move them to a pot with some good, well-draining soil. Keep things moist but not soggy, and watch as your new little ZZ plants settle in.
Want to dive even deeper into ZZ plant propagation or check out other methods? Head over to our zz plant propagation in water article for more fun details.
Following these steps, you’ll become a ZZ plant pro in no time, filling your home with these tough, striking friends. Need more tips on keeping them happy? Check out our zz plant indoor care guide for the latest scoop.
ZZ Plant Stem Cuttings
Growing new ZZ plants from stem cuttings is a pretty genius move—easy and way better than trying the leaf deal. You just need a piece of your ZZ plant that you can coax into sprouting roots to get a whole new plant out of the deal.
Stem Cutting Process
Here’s how to do it:
-
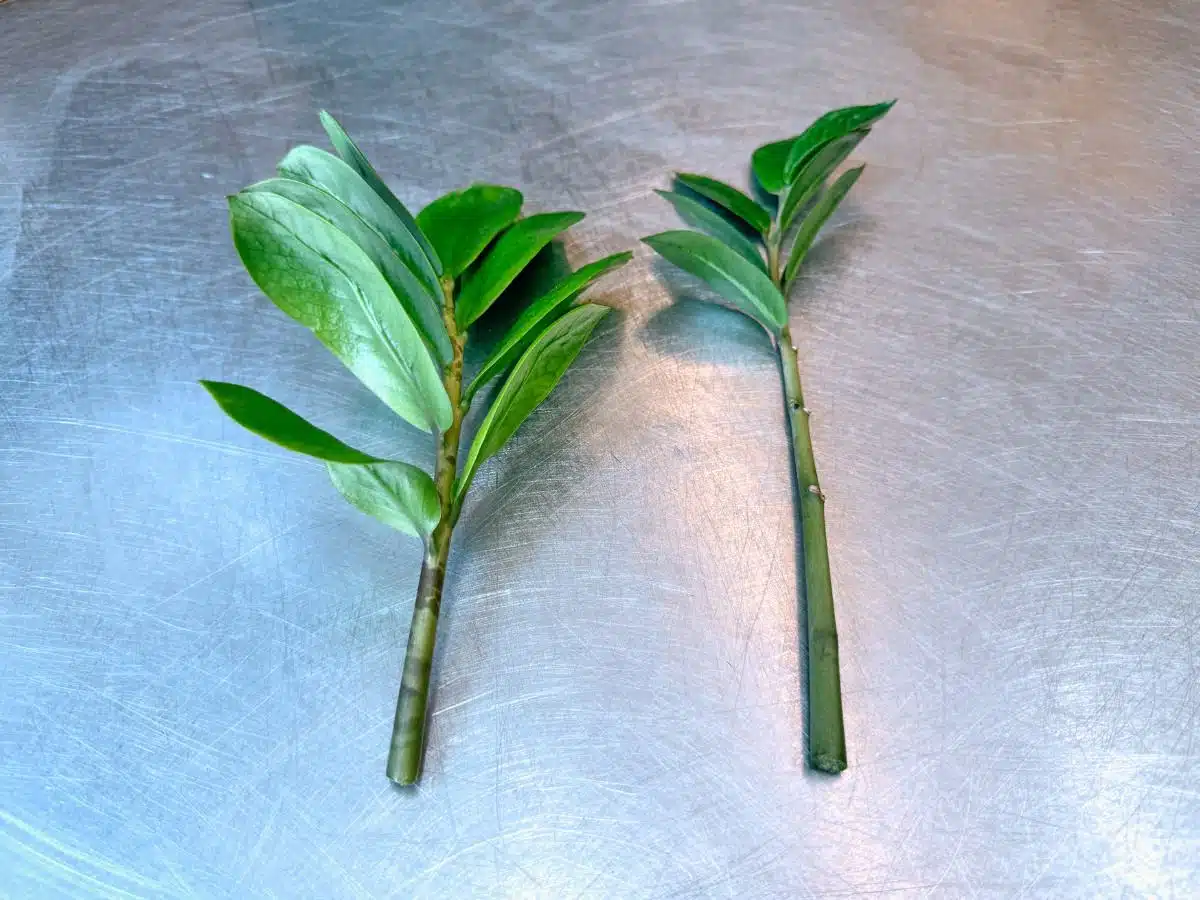
Pick a Rock-Solid Stem: Look for a mature stem that’s got some length—at least 4 inches. This gives your new plant a strong start.
-
Hack the Stem: Grab some sharp, clean scissors or garden shears and slice it at an angle. Why? More room for roots to pop out.
-
Rooting Time:
-
In Water: Dunk the cutting’s base in a glass of water. Just the bottom, though. Change out the water every couple of days so it stays fresh.
-
In Dirt: Stick the cutting in some airy, fast-draining soil. Try mixing coconut coir with perlite for a great combo (Blooming Backyard).
- Root Watch: Set your cutting where it gets some indirect sunlight. In a few weeks, you should notice some root action. Water works a bit faster for roots than dirt does (Instructables).
Keys to Sprouting Roots
Getting roots to grow strong takes some fine-tuning. Here are the deets you need to know:
-
Keep it Toasty: Aim for a cozy temp between 70-85°F. The warm up speeds those roots along. Need more info? Check out zz plant temperature tolerance.
-
Light it Right: Get those cuttings some bright, indirect light. Stay away from direct rays that could scorch them. We’ve got tips over at zz plant light.
-
Water Right: No matter how you’re growing it, keep things moist but not soggy. Too much water is bad news, too little and they’ll dry up. Check out more water tips at zz plant water requirements.
-
Humidity Helps: A bit of extra humidity, like 60-70%, can really get those roots going. There’s more on that in our zz plant humidity article.
| Thing to Watch | Prime Setup |
|---|---|
| Temperature | 70-85°F |
| Light | Bright, indirect light |
| Watering | Moist but not swampy |
| Humidity | 60-70% |
Stick to this plan, and you’ll probably end up with a bunch of thriving ZZ plants from your cuttings. We’ve even more handy info over at zz plant indoor care and zz plant repotting.
By mastering this cutting technique and knowing what it takes to get roots growing, you’ll have no problem multiplying your ZZ plants, making them all lush and healthy.
Division Propagation Method
Benefits of Division Propagation
So, you wanna multiply your ZZ plants, huh? Division propagation is the go-to move. It’s hands-down the most dependable way to boost your ZZ plant numbers, and trust me, it works every time. Not only does it give the original plant a new lease on life, but it also spawns new buds that can stand on their own roots (Lively Root).
- Speedy plant multiplication
- Root growth is a sure thing
- Refreshes the mother plant
How to Divide a ZZ Plant
Ready to get your hands dirty? Dividing your ZZ plant’s as easy as pie if you play it right. Just stick to these steps and turn one plant into a whole gang. This method means splitting an older plant into smaller parts, each with its own set of roots, waiting to settle into new homes.
- Remove the Plant: Gently lift the ZZ plant out of its pot.
- Separate Sections: Tug apart sections with visible roots. Make sure every piece has enough roots to kickstart fresh growth.
- Prepare New Pots: Nestle each part into a pot with some good houseplant soil mix. The right dirt feeds your new green babies (zz plant potting soil).
- Water Thoroughly: Give the newly potted parts a solid drink.
- Optimal Placement: Place those pots in a spot that’s bright but not in direct sunlight to keep them happy.
Follow these steps, and you’ll have a bunch of thriving ZZ offspring.
| Step | Description |
|---|---|
| Remove the Plant | Lift the plant carefully out of its pot. |
| Separate Sections | Let the roots guide you as you divide it. |
| Prepare New Pots | Settle each section in its own pot with a cozy soil mix. |
| Water Thoroughly | Don’t skimp on the water, each needs a good soak. |
| Optimal Placement | Bright areas with indirect light are where it’s at. |
Stick with these pointers, and your ZZ division propagation will be a smashing success, leaving you with a garden of vigorous new plants ready to impress. If things go sideways, check out our tips for successful propagation.
Tips for Successful Propagation
Getting a ZZ plant to sprout new roots can be a rewarding experience, but it’s all about setting the stage right and tackling any hiccups along the way. Here are some pointers I’ve picked up to make sure my ZZ plant propagation goes smoothly.
Keeping Conditions on Point
If you want your ZZ plant cuttings to thrive, you’ve gotta give them the right setup. Here’s how I make sure my plants are living their best lives:
- Temperature: Keeping it warm between 76-90°F (or 24-32°C for those on the other side of the pond) works wonders for growth. A little heater mat can fast-track the process (Ohio Tropics).
- Water: Whether your plant babies are chilling in soil or soaking in water, you’ve got to keep things just right. Changing the water every couple of weeks helps avoid stinky bacteria and keeps your cuttings happy (Instructables).
| Factor | Sweet Spot |
|---|---|
| Temperature | 76°F-90°F (24°C-32°C) |
| Water Change | Every 2 weeks |
| Growing Medium | Snazzy draining potting mix or H2O |
Troubleshooting Common Problems
Sometimes, things don’t go quite as planned. Here’s a few hiccups I’ve run into, and how I smooth them over:
- Yellowing Leaves: Leaves getting a little too much sun or drink? Move them to a cozy spot with less direct light and keep an eye on that soil squishiness. More on that pickle at zz plant leaves turning yellow.
- Stem Rot: Soggy bottoms can be a real downer—too much water or a bad drainage situation’s usually to blame. Make sure you’re using a mix that drains well and that your pot lets water escape.
- No Root Growth: If your cutting’s still all leaf and no root after a few weeks, try warming things up a bit or trapping a little humidity under a cover to give it a kick-start (Epic Gardening).
For more head-scratchers or handy hints, dive into topics like zz plant root rot or zz plant not growing.
By keeping an eagle eye on conditions and fixing issues lickety-split, your zz plant leaf propagation will be headed for success. Remember, patience and a bit of TLC go a long way in growing those ZZ plant cuttings into the pride of your plant collection.


