Propagating Peace Lilies
Proper propagation of peace lilies ensures healthy growth and vibrant plants. This section covers the best time for repotting and the division method for propagation, providing detailed steps and insights for gardeners.
Best Time for Repotting
Repotting peace lilies is ideally done in late winter or early spring. At this time, the plant is preparing for its active growing season, making it more resilient to the stress of repotting (Pennington).
Division Method for Propagation
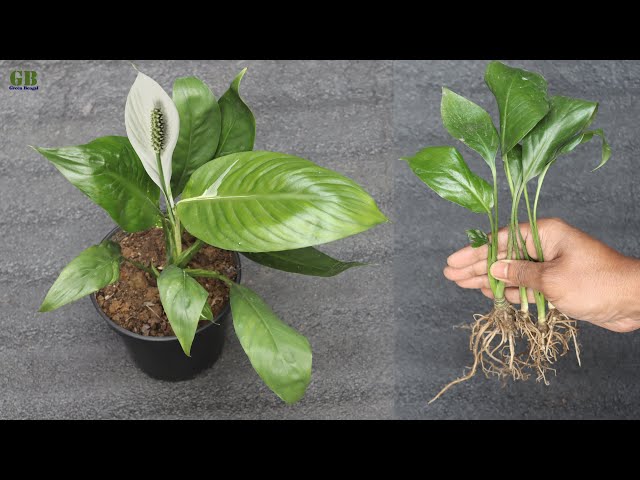
Peace lilies can be effectively propagated by division, a method that allows for instant expansion of your plant collection. As the plant grows and outgrows its container, it can be divided into smaller sections, each with its roots and foliage, promoting the growth of independent plants with already growing roots.
Steps for Division Method
-
Preparation:
- Select a mature peace lily that has outgrown its container.
- Prepare new containers with a suitable potting mix.
-
Removing the Plant:
- Carefully take the peace lily out of its pot. Gently shake off excess soil to reveal the root system.
-
Dividing the Plant:
- Use a clean, sharp knife or pruning shears to divide the plant into sections. Each section should have a good amount of roots and foliage.
- Aim for sections that are at least 4-6 inches in diameter to ensure they have enough strength to establish themselves.
-
Replanting:
- Place each divided section into its new container. Ensure the roots are spread out and covered with soil.
-
Watering:
- Water the newly potted plants thoroughly but do not let them sit in waterlogged soil.
Benefits of Division Method
- Efficiency: Quick and easy way to create new plants without the need for extensive waiting periods.
- Growth: Each divided section continues to grow independently, promoting a healthier, more vigorous plant.
- Resourcefulness: Utilizes an existing mature plant to generate new plants, reducing the need for purchasing new plants.
For more details on caring for peace lilies after propagation, refer to our section on aftercare for divided plants.
By following these steps, gardeners can successfully propagate peace lilies and enjoy a thriving indoor garden. For more tips and detailed guidance on other propagation methods, such as water propagation and alternatives like propagation from seeds, explore our related articles.
Dividing Peace Lilies
Propagation by division is a reliable method to create new peace lily plants. Here, we outline the step-by-step process and essential aftercare practices to ensure successful propagation.
Process of Division
The division method involves separating a mature peace lily into multiple sections that can be replanted. Follow these steps for successful division:
-
Remove the Plant from Its Pot: Gently remove the peace lily from its container. Ensure minimal root disturbance to reduce the risk of transplant shock.
-
Tease the Roots: Loosen the root ball by gently teasing the roots apart.
-
Divide the Plant: Carefully split the plant into smaller sections, each with its own set of roots and leaves. Using clean, sharp tools ensures clean cuts and reduces the risk of damaging the roots.
-
Replant Each Section: Place each division into a new pot filled with well-draining potting mix, ensuring the roots are well covered.
-
Water Thoroughly: After replanting, water the soil thoroughly to help the roots settle and encourage their spread (Homes and Gardens).
Aftercare for Divided Plants
Once divided and replanted, the peace lilies require attentive aftercare to thrive. Follow these best practices:
| Aftercare Tip | Details |
|---|---|
| Watering | Avoid overwatering to prevent root rot. Initially, keep the soil moist but not soggy. |
| Lighting | Place the plants in a location with indirect sunlight. Avoid direct sun as it may cause the leaves to scorch (Homes & Gardens). |
| Humidity | Maintain a humid environment, which can be achieved by misting the leaves or placing a tray with water near the plants. |
| Monitoring Recovery | Regularly check for signs of wilting or stress. It may take a couple of weeks for the plants to establish and focus on root growth. |
| Fertilization | Use a balanced, diluted fertilizer every few months. Avoid over-fertilizing, as it can lead to salt buildup in the soil. |
Taking care of divided peace lilies involves not just the initial steps of division, but also providing continuous aftercare. For additional tips and troubleshooting common problems, visit our articles on peace lily plant care instructions and peace lily plant maintenance.
Container and Soil Requirements
Successful propagation and cultivation of peace lilies hinge on selecting the right containers and potting mix.
Choosing Suitable Containers
Selecting the right container is a vital aspect of peace lily plant propagation. Peace lilies thrive in containers with drainage holes to prevent root rot. Adequate drainage ensures that water does not accumulate at the bottom of the pot, which can lead to soggy soil and unhealthy roots.
For peace lilies, opting for containers made from recycled plastic is recommended. These pots are not only environmentally friendly, but they also provide stability and durability. Additionally, recycled plastic pots are lightweight, making it easier to handle and move your plants when necessary.
| Container Type | Benefits |
|---|---|
| Recycled Plastic | Lightweight, durable, environmentally friendly |
| Ceramic | Aesthetic appeal, stability |
| Terracotta | Porous, allows excess moisture to evaporate |
For gardeners, ensuring that the container size is appropriate for the plant is crucial. A container that is too large can retain excess moisture, while one that is too small can restrict root growth, causing stress to the plant.
Ideal Potting Mix
The choice of potting mix is as important as the container itself. Peace lilies require a fresh houseplant potting mix that is well-draining yet retains moisture sufficiently to support their growth. The ideal potting mix should provide the roots with proper aeration and nutrients essential for a healthy plant (Homes and Gardens).
A beneficial potting mix for peace lilies typically includes:
- Peat Moss: Retains moisture while providing aeration.
- Perlite or Vermiculite: Enhances drainage and prevents soil compaction.
- Pine Bark: Adds structure to the soil mix and aids in drainage.
When preparing the potting mix, the following ratio can be used for optimal results:
| Ingredient | Ratio |
|---|---|
| Peat Moss | 50% |
| Perlite or Vermiculite | 25% |
| Pine Bark | 25% |
Utilizing this combination ensures that the soil remains well-aerated, not too dense, and provides sufficient nutrients and moisture for the propagated peace lilies to flourish.
By adhering to these container and soil requirements, gardeners can establish a healthy environment for their peace lilies, promoting vigorous growth and successful propagation. For more information on issues related to peace lily care, such as yellow leaves or drooping leaves, check out our in-depth guides.
Water Propagation Method
Peace lilies are well-suited for water propagation due to their exceptional ability to produce new shoots from their root systems (Cafe Planta). This method is not only simple but also cost-effective and results in stronger, healthier plants.
Steps for Water Propagation
- Select a Healthy Plant: Choose a mature peace lily with healthy foliage and roots.
- Prepare the Cutting: Use a clean pair of scissors to cut a section of the stem, ensuring it has at least one or two leaves attached.
- Submerge the Cutting: Place the cutting into a jar filled with water, ensuring the roots are submerged while the leaves remain above the waterline.
- Optimal Light Conditions: Place the jar in a warm, brightly lit location, away from direct sunlight. Peace lilies thrive in bright, indirect light (Cafe Planta).
- Monitor Water Levels: Keep the water level consistent, topping it up as necessary. Change the water every week to prevent stagnation and promote healthy root growth.
- Wait for Root Development: It usually takes around four to six weeks for roots to develop to a sufficient length (Cafe Planta).
| Step | Duration |
|---|---|
| Root Development | 4-6 weeks |
Transitioning to Soil
- Check Root Length: Once the roots are at least two inches long, the cutting is ready to be transferred to soil. This ensures successful establishment and nutrient intake (Cafe Planta).
- Prepare a Pot: Choose a suitable pot with drainage holes and fill it with a mix specifically designed for peace lilies.
- Plant the Cutting: Carefully transfer the cutting from the water jar to the pot, ensuring the roots are covered with soil while the leaves are above.
- Water the Plant: Water the newly potted plant thoroughly but make sure the soil is not waterlogged.
- Optimal Growing Conditions: Place the pot in a location with bright, indirect light. Regularly monitor the soil moisture, ensuring it remains slightly moist but not soggy.
For more detailed guidance on suitable containers and soil mixes, refer to our section on peace lily plant repotting. Additionally, understanding the various propagation methods can help you address common plant issues, such as peace lily plant drooping leaves or peace lily plant leaves turning brown.
Propagation Alternatives
When it comes to propagating a peace lily plant, there are several methods beyond division. This section covers propagation from seeds and common issues gardeners might face.
Propagation from Seeds
Propagating a peace lily from seeds is a less common but rewarding method. This approach requires patience as germination can take around 10 days. Here are the main steps:
- Seed Collection: Collect seeds from the flower of a mature peace lily. Ensure the seeds are dry and free from any debris.
- Sowing: Plant the seeds in a potting mix suited for germination. A mix of peat moss and perlite works well.
- Watering: Keep the soil consistently moist but not waterlogged. Covering the pot with plastic wrap can help retain moisture.
- Lighting: Place the pot in a location with indirect light. Direct sunlight may be too harsh for young seedlings.
To read more about peace lily seeds, visit our page on peace lily plant seeds.
| Step | Description |
|---|---|
| Seed Collection | Collect and dry mature seeds |
| Sowing | Use peat moss and perlite mix |
| Watering | Keep soil moist, not waterlogged |
| Lighting | Indirect light is best |
Common Plant Issues and Solutions
Despite their resilient nature, peace lilies can face several common problems. Being attentive to their needs helps prevent and address these issues, ensuring healthy growth post-propagation.
Overwatering:
- Symptoms: Yellow leaves, drooping appearance.
- Solution: Reduce watering frequency. Ensure the pot has good drainage to prevent water accumulation.
Insufficient Light:
- Symptoms: Poor growth, fewer blooms.
- Solution: Place the plant in a spot with bright, indirect light. Avoid direct sunlight which can scorch the leaves.
Fungal Infections:
- Symptoms: Black or brown spots on leaves.
- Solution: Remove affected leaves. Use a fungicide if necessary and improve air circulation around the plant.
Nutrient Deficiency:
- Symptoms: Pale leaves, slow growth.
- Solution: Use a balanced peace lily plant fertilizer to provide essential nutrients.
For more details on addressing common issues, check out our guides on peace lily plant yellow leaves and peace lily plant care instructions.
By exploring alternative propagation methods and being vigilant of common issues, gardeners can successfully expand their peace lily collection while maintaining healthy plants.


