Watering the Rubber Plant
Understanding the water needs of your rubber plant is crucial for its healthy growth. Below, we’ll explore the water requirements and signs of overwatering and underwatering to help you maintain your plant’s health.
Water Requirements
Rubber plants require precise watering to thrive. They prefer dry environments and do best in well-draining soil with organic matter, perlite, or vermiculite for drainage (Greg). The amount and frequency of watering depend on factors such as pot size and exposure to sunlight. For instance, if your rubber plant is in a 5″ pot and not receiving direct sunlight, it typically needs 0.5 cups of water every 9 days.
| Condition | Water Amount | Frequency |
|---|---|---|
| 5″ pot, no sunlight | 0.5 cups | Every 9 days |
| 5″ pot, direct sunlight | Varied | Check every few days |
It’s essential to allow the top soil to dry out before watering again to prevent waterlogging, which can lead to root rot.
Signs of Overwatering and Underwatering
Detecting the signs of overwatering and underwatering will help you adjust your watering schedule and keep your rubber plant healthy.
Overwatering
Overwatering can cause several issues, including root rot and leaf drop. The rubber plant does not like “soggy feet” and will start losing its leaves if overwatered (Plantura). If you notice the following symptoms, you might be overwatering your plant:
- Yellowing leaves
- Leaf drop
- Soggy soil
- Root rot
For more detailed information on overwatering signs, visit our guide on rubber plant overwatered.
Underwatering
Underwatering your rubber plant can also lead to problems, mainly exhibited as drought stress. Look out for these symptoms:
- Wilting leaves
- Dry or crispy leaf edges
- Slow growth
If any of these signs appear, it might be time to increase watering frequency or water amount.
By regularly inspecting your rubber plant, you can adjust your watering practices to meet its needs. Understanding these requirements and signs will set you on the path to maintaining a healthy and vibrant rubber plant. For further guidance on rubber plant care, check out our articles on rubber plant pruning and rubber plant repotting.
Watering Techniques
To ensure your rubber plant thrives, it’s essential to use the right watering techniques. Two effective methods are the Finger Test Method and the Immersion Watering Method.
Finger Test Method
The Finger Test Method is a simple yet effective way to determine when your rubber plant needs water. This technique helps prevent overwatering and underwatering, both of which can harm your plant.
- Step 1: Insert your finger into the soil up to the first knuckle (about an inch deep).
- Step 2: Feel the soil’s moisture level.
- If the soil feels dry, it’s time to water your plant.
- If it feels damp, wait a few days before checking again.
Rubber plants do not like soggy roots and will lose leaves if overwatered. Aim to water the plant when the top inch of soil is dry. This usually means watering every few weeks with lukewarm, stagnant water. Be sure to remove any excess water from the drainage dish to prevent root rot.
For more tips on managing watering, visit our articles on rubber plant overwatered and rubber plant root rot.
Immersion Watering Method
The Immersion Watering Method is ideal for ensuring the roots of your rubber plant receive adequate moisture without overwatering. This method is especially useful in preventing uneven water distribution.
- Step 1: Fill a bucket or basin with lukewarm water.
- Step 2: Place the potted rubber plant into the bucket, ensuring the water level reaches just below the rim of the pot.
- Step 3: Let the plant sit in the water for a few minutes, allowing the roots to soak up moisture through the drainage holes.
This method ensures the root ball is thoroughly saturated while preventing excess water from accumulating on the surface soil (Plantura Garden).
For more on rubber plant care, visit our articles on rubber plant soil mix and rubber plant repotting.
Tables can be helpful for summarizing watering frequency:
| Watering Method | Frequency | Benefits |
|---|---|---|
| Finger Test Method | Every few weeks, as needed | Prevents overwatering, easy to implement |
| Immersion Watering Method | Every few weeks, as needed | Ensures even root moisture, prevents water accumulation |
By utilizing these techniques, you can help your rubber plant stay healthy and avoid common watering pitfalls.
Fertilizing the Rubber Plant
Effective fertilization is essential for the healthy growth of your rubber plant. Here, we will discuss various fertilizer options and the recommended frequency of fertilization to ensure your plant thrives.
Fertilizer Options
Rubber plants benefit from different types of fertilizers, each providing essential nutrients. Choosing the right fertilizer will help maintain the plant’s health without overfeeding.
Liquid Fertilizer
Liquid fertilizers are easy to apply and offer quick nutrient absorption. A balanced liquid fertilizer, such as Foliage-Pro 9-3-6, is ideal for rubber plants, providing the necessary macro and micronutrients.
Slow-Release Fertilizer
Slow-release fertilizers gradually supply nutrients over a longer period, reducing the need for frequent applications. This type of fertilizer is environmentally friendly and ensures consistent feeding (Plantura Garden). Plantura All Purpose Plant Food is a good option for slow-release fertilization.
Natural Fertilizer
Repotting with fresh potting soil that contains ample nutrients is another effective method. This not only provides necessary feeding but ensures healthy root development.
| Fertilizer Type | Recommended Option | Key Benefit |
|---|---|---|
| Liquid | Foliage-Pro 9-3-6 | Quick nutrient absorption |
| Slow-Release | Plantura All Purpose Plant Food | Consistent, long-term feeding |
| Natural | Fresh Potting Soil | Nutrient-rich, promotes root health |
Frequency of Fertilization
The frequency of fertilizing your rubber plant can vary based on the type of fertilizer used and the specific needs of your plant.
Liquid Fertilizer
It is generally recommended to apply a balanced liquid fertilizer every six weeks. This ensures that your plant receives a regular supply of nutrients without the risk of overfeeding (Plantura).
Slow-Release Fertilizer
Slow-release fertilizers reduce the need for frequent applications. Using a slow-release option every three months is sufficient to keep the plant well-nourished and healthy (Plantura Garden).
Natural Fertilizer
Repotting your rubber plant once a year with nutrient-rich potting soil is a great way to ensure it gets the necessary nutrients throughout the year. This aids in maintaining consistent growth and overall plant health.
For more detailed guidance on caring for your rubber plant, you can check out our articles on rubber plant soil mix, rubber plant pruning, and rubber plant repotting.
| Fertilizer Type | Application Frequency |
|---|---|
| Liquid | Every six weeks |
| Slow-Release | Every three months |
| Natural | Once a year during repotting |
Proper fertilization, along with regular watering and maintenance, will ensure your rubber plant remains healthy and vibrant. For more tips on cultivating your rubber plant, check out our detailed guides on rubber plant growth rate and rubber plant care in winter.
Pruning Tips for Rubber Plants
Pruning is an essential aspect of caring for your rubber plant. It helps control growth, encourages new growth, and shapes the plant to your desired form.
Importance of Pruning
Pruning your rubber plant offers several benefits:
- Control Growth: Regular pruning helps manage the size of your rubber plant. This is especially important if your plant becomes too tall or leggy.
- Encourages New Growth: Pruning stimulates new growth by removing older, less productive parts of the plant.
- Shape the Plant: Pruning allows you to shape the plant to fit your aesthetic preferences, whether that’s a bushier look or a specific form.
Pruning rubber plants at the right time is crucial. Pruning during winter or in the evening can minimize sap secretion.
Tools and Techniques
Using the correct tools and techniques ensures healthy and efficient pruning.
Tools
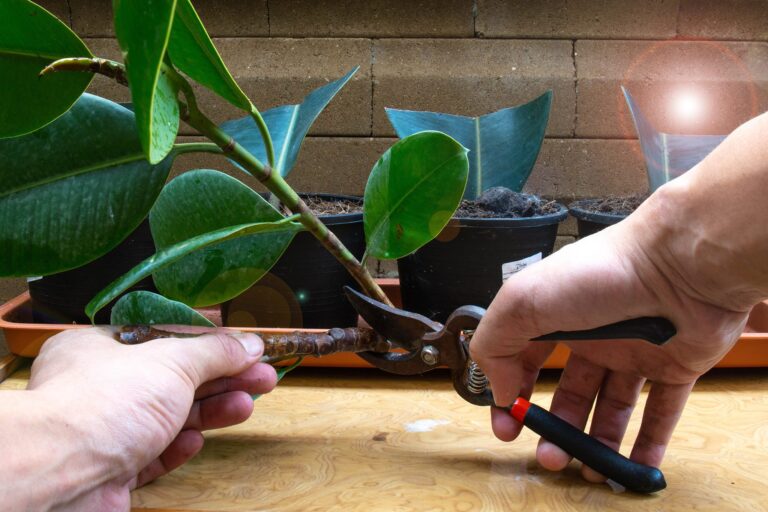
- Sharp Knife or Secateurs: Always use clean, sharp tools to avoid causing damage. Ensure they are sterilized to prevent infections.
| Tool | Description |
|---|---|
| Sharp Knife | Ideal for clean, precise cuts |
| Secateurs | Excellent for pruning thicker branches |
Techniques
- Make Clean Cuts: Ensure each cut is clean and precise to promote faster healing.
- Deal with Sap: Rubber plants secrete a milky, sticky sap when pruned. Dab the sap with a damp cloth or sprinkle lukewarm water over the cut to manage it.
- Prune Lower Branches: Focus on pruning lower branches to help the plant become more self-supporting. Shortening the trunk can quickly strengthen it.
Pruning tips for specific types of rubber plants, such as burgundy rubber tree care and tineke rubber tree care, can ensure correct approaches for different varieties.
Regular pruning keeps your rubber plant healthy and aesthetically pleasing. For more on caring for your rubber plant, check out articles on rubber plant soil and rubber plant repotting.
Location and Light Considerations
Understanding where to place your rubber plant and how much light it needs is essential for its growth and well-being. This section provides guidelines on the ideal location and light conditions for your rubber plant.
Ideal Placement for Growth
Rubber plants thrive best when placed near bright, sunny windows. Positioning your rubber plant within a foot of a south-facing window is ideal to maximize its growth potential. They love being close to natural light sources, yet they do not fare well in low-light environments. Avoid placing the plant in areas with insufficient sunlight, as this can hinder its growth and affect its foliage.
To ensure optimal growth, consider the rubber plant’s preference for dry environments. Ensure it is placed in a well-ventilated area with good air circulation. This helps prevent issues like overwatering and root rot. For more on preventing these issues, read about rubber plant root rot.
Light Requirements for Healthy Growth
Rubber plants have specific light requirements that contribute to their overall health and appearance. While they enjoy bright, indirect sunlight, prolonged exposure to direct sunlight can lead to leaf burn. If the light conditions are too dim, the plant may exhibit signs like elongated stems as it reaches for more light, or you might notice rubber plant leaves curling.
| Light Condition | Effect on Rubber Plant |
|---|---|
| Bright, Indirect Sunlight | Optimal growth and vibrant leaves |
| Direct Sunlight | Potential leaf burn and damage |
| Low Light | Stunted growth, leaf drop, and stretching |
Maintaining the right light balance is key to preserving the health of your rubber plant. Monitoring and adjusting the light exposure can also help in preventing common issues such as rubber plant leaves falling off and rubber plant leaves turning yellow.
For additional tips on ensuring your rubber plant thrives in the right environment, check out related guides on rubber plant care in winter and rubber plant repotting.
Understanding the location and light needs of your rubber plant allows you to create an optimal growing environment, ensuring a healthy and vibrant plant.
Soil and Potting Care
Proper soil and potting care are vital for the healthy growth of your rubber plant. Ensuring the right soil composition and repotting guidelines will help your plant thrive.
Soil Composition
Rubber plants prefer well-draining soil to prevent waterlogging, which can lead to root rot. An ideal soil mix includes organic matter and components like perlite or vermiculite to enhance drainage and aeration. According to Plantura Garden, this combination ensures that the soil stays moist without becoming overly wet.
For optimal results, the soil should have the following composition:
| Component | Purpose |
|---|---|
| Organic Matter | Provides nutrients |
| Perlite | Enhances drainage |
| Vermiculite | Improves aeration |
Using this mix helps maintain the plant’s health by preventing waterlogging and promoting proper root development. For more information, refer to our guide on rubber plant soil.
Repotting Guidelines
Rubber plants should be repotted when they double in size or once a year. Fresh potting soil is essential as it contains necessary nutrients for continued growth. According to Greg, repotting helps prevent the plant from becoming root-bound and ensures that it has enough space to grow.
Steps for repotting your rubber plant:
- Choose a pot that is 1-2 inches larger in diameter than the current pot.
- Prepare fresh potting soil with organic matter, perlite, and vermiculite.
- Gently remove the plant from its current pot, taking care not to damage the roots.
- Place a layer of fresh soil at the bottom of the new pot.
- Position the plant in the new pot and fill around it with additional soil, ensuring the roots are covered.
- Water the plant thoroughly and allow excess water to drain out.
It’s important to monitor your plant’s condition after repotting. If you notice signs of stress, such as leaves turning yellow or leaves falling off, adjust your care routine accordingly.
For additional insights on proper care and maintenance, including watering techniques, check out our detailed articles on rubber plant repotting and rubber plant overwatered.


