Rubber Plant Care Basics
Rubber plants are a popular choice for indoor gardening due to their attractive foliage and relatively low maintenance needs. To keep your rubber plant thriving, it’s essential to understand its basic requirements and recognize common issues, such as overwatering.
Understanding Rubber Plant Needs
Rubber plants prefer bright, indirect light and a well-draining soil mix. Ensuring proper light conditions can prevent many issues related to growth and foliage health. For more information on light requirements, visit our guide on rubber plant light requirements.
Basic Care Checklist:
- Light: Bright, indirect light
- Soil: Well-draining potting soil
- Watering: Allow the top inch of soil to dry out between waterings
- Humidity: Medium to high humidity
- Temperature: 60-75°F (15-24°C)
For an effective soil mix, consider our detailed guide on rubber plant soil.
Signs of Overwatering
Overwatering is a prevalent issue for rubber plant owners, often leading to multiple health problems. Recognizing the symptoms early can help you take corrective measures to save your plant.
Common Signs of Overwatering:
| Symptom | Description |
|---|---|
| Drooping Leaves | Leaves appear wilted and may lose their stiffness, often leading to rubber plant leaves falling off |
| Yellowing Leaves | Leaves turn yellow due to waterlogged soil and root rot. For more information, see rubber plant leaves turning yellow |
| Root Rot Symptoms | Roots become mushy and emit a foul odor. This condition can also cause the plant to droop (Greg App) |
Recognizing these signs and taking timely action can help prevent long-term damage. Correct water management practices, such as checking soil moisture before watering, are crucial to maintaining a healthy plant. For more on managing watering, check out our guide on rubber plant watering.
By understanding the basic needs of your rubber plant and recognizing the signs of overwatering, you can ensure your plant remains healthy and vibrant. For more tips on dealing with various issues and promoting healthy growth, visit our section on rubber plant care in winter.
How to Identify Overwatering
Recognizing the signs of an overwatered rubber plant is crucial for preventing long-term damage. Here are some of the key indicators to look out for.
Drooping Leaves
Drooping leaves can be a common sign that your rubber plant is suffering from overwatering. When the soil remains consistently too wet, the roots can become waterlogged, leading to root rot. This causes the plant to lose its ability to take up water and nutrients, resulting in drooping leaves (Florasense).
To check for overwatering, ensure the top inch of the soil is dry before you water again. Consistently soggy soil often leads to leaf drooping. Drooping can also be caused by underwatering, so it’s important to find a balance. For more details on proper watering practices, visit our guide on rubber plant watering.
Yellowing Leaves
Yellowing leaves are another clear sign that your rubber plant might be overwatered. When the roots are overly saturated with water, they can’t adequately supply the plant with nutrients, causing the leaves to turn yellow (Florasense).
| Cause | Symptom |
|---|---|
| Overwatering | Yellowing leaves |
| Underwatering | Yellowing leaves |
| Lack of light | Dropping leaves |
Compare this with yellowing caused by underwatering, which makes the soil too dry for the plant’s health. It’s essential to differentiate between the two to adjust your watering schedule. Learn more about yellowing leaves in our rubber plant leaves turning yellow article.
Root Rot Symptoms
Root rot is a severe and often fatal condition caused by prolonged overwatering. The roots begin to rot due to the excessive moisture and lack of oxygen, turning mushy and black. You might notice a foul odor coming from the soil, another sign of root rot.
To detect root rot, you may need to carefully remove the plant from its pot and inspect the roots. Healthy roots should be white and firm, while rotten roots will appear dark and mushy. Immediate action is crucial to save an overwatered plant. Check our tips on rubber plant root rot for more information.
Recognizing these symptoms can help you quickly identify and address overwatering issues, ensuring your rubber plant remains healthy and vibrant.
Corrective Measures for Overwatered Rubber Plants
Overwatering rubber plants can lead to several issues like root rot and yellowing or drooping leaves. To ensure your plant’s health, implementing corrective measures is essential.
Adjusting Watering Practices
Correct watering practices are paramount for preventing rubber plant issues. It’s crucial to check the moisture of the soil before watering to avoid overwatering. Stick your finger about an inch into the soil; if it feels dry, it’s time to water. If it still feels moist, wait a few days before checking again (Greg App).
Here are some tips for adjusting your watering practices:
- Frequency: Water your rubber plant only when the topsoil is dry to the touch.
- Quantity: Ensure that you water deeply but infrequently. Let the water drain out from the bottom to avoid waterlogging.
- Tools: Use a moisture meter to get a precise measurement of the soil’s moisture content.
Repotting Techniques
When overwatering occurs, repotting can help rectify issues like root rot. Here are steps to effectively repot an overwatered rubber plant (Fig & Bloom):
- Remove the Plant: Carefully remove the rubber plant from its current pot.
- Examine Roots: Check for mushy, blackened roots indicating rot. Healthy roots are white and firm.
- Trim Damaged Roots: Use sterilized scissors to trim away any rotten roots.
- Treat with Fungicide: Apply a fungicide safe for rubber plants to the remaining healthy roots to prevent further rot.
- Air Out: Let the plant air out for a day to ensure the roots are dry before repotting.
- New Soil and Pot: Choose a well-draining soil mix and a pot with drainage holes (rubber plant soil mix; rubber plant pot size).
- Repotting: Gently place the plant in the new pot and fill it with the soil mix.
- Watering: Wait for a week to 10 days before watering again and then continue with appropriate watering practices.
These methods will help revive your overwatered rubber plant and promote healthier growth. For further guidance, you can check resources on related topics like rubber plant root rot and rubber plant repotting.
OppRecap Table of Symptoms and Actions for Overwatered Rubber Plants
| Symptom | Action |
|---|---|
| Drooping leaves | Check soil moisture, adjust watering frequency |
| Yellowing leaves | Allow soil to dry, reduce watering |
| Root rot (mushy roots) | Trim affected roots, treat with fungicide, repot |
| Black spots on leaves | Remove damaged leaves, ensure proper watering practices |
For ongoing care and prevention of common issues, refer to our articles on rubber plant leaves falling off and rubber plant leaves turning yellow.
Preventing Overwatering
To keep your rubber plant healthy, it’s crucial to avoid overwatering, which can lead to root rot and other issues. Here are some effective ways to prevent overwatering, focusing on soil, drainage, and watering practices.
Soil and Drainage Considerations
Proper soil and drainage are key to preventing overwatering and ensuring your rubber plant thrives. Here are some tips:
-
Choose the Right Soil: Use a well-draining soil mix to prevent water from accumulating around the roots. You can find more information on suitable soil mixes in our article on rubber plant soil.
-
Ensure Proper Drainage: Make sure your plant pot has drainage holes. This simple feature allows excess water to escape and prevents root rot (Leon and George Blog).
-
Aerate the Soil: Occasionally aerate the soil to improve air circulation and drainage. This helps in avoiding compacted soil that retains too much moisture.
| Factor | Recommendation |
|---|---|
| Soil Type | Well-draining mix |
| Pot Features | Drainage holes |
| Maintenance | Soil aeration |
For more details on the negative impacts of poor soil and drainage, refer to our guide on rubber plant leaves falling off.
Proper Watering Schedule
Establishing a proper watering schedule is essential in preventing overwatering. Here’s how you can create a balanced watering routine:
-
Check Soil Moisture: Before watering, always check the soil moisture. The top inch of soil should be dry before you water again (Leon and George Blog).
-
Seasonal Adjustments: Adjust your watering frequency based on the season. Rubber plants generally require less water in the winter months and more during the growing season (Florasense).
-
Consistent Routine: Maintain a consistent watering schedule to help your plant develop a strong root system. Regular watering intervals can help prevent the sudden shock that can occur with sporadic watering.
| Season | Watering Frequency |
|---|---|
| Spring/Summer | Every 7-10 days |
| Fall/Winter | Every 14-21 days |
For further information on maintaining a proper watering routine, take a look at our in-depth article on rubber plant watering.
By following these soil, drainage, and watering practices, you can significantly reduce the risk of overwatering and keep your rubber plants healthy and thriving.
Dealing with Leaf Issues
Managing leaf problems is critical for maintaining the health and appearance of your rubber plant. Here we explore leaf pruning tips and how to address brown spots, especially when your rubber plant is overwatered.
Leaf Pruning Tips
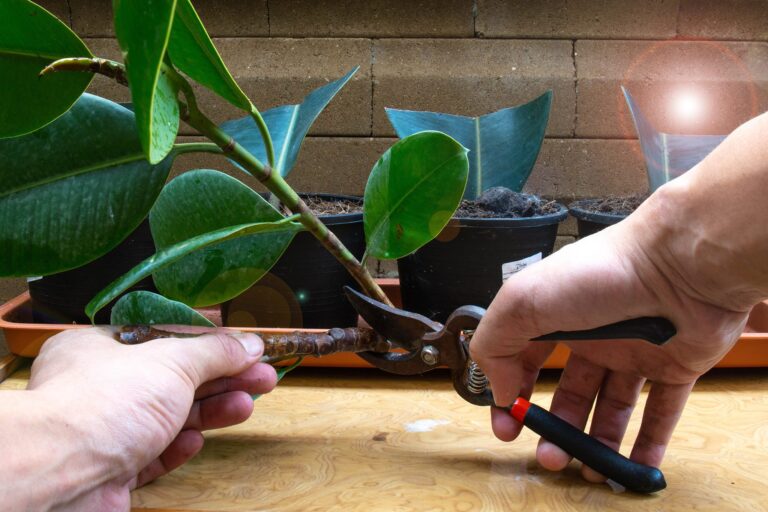
Pruning dead or dying branches encourages new growth and helps maintain a balanced structure. Thinning out crowded areas increases light penetration and air flow, strengthening your plant (Greg App). Here are some effective tips for pruning your rubber plant leaves:
- Use Sharp, Clean Tools: Ensure your pruning shears or scissors are clean and sharp to prevent introducing diseases.
- Remove Dead or Damaged Leaves: Cut off leaves that are brown, yellow, or black. Target the base of the leaf where it attaches to the stem.
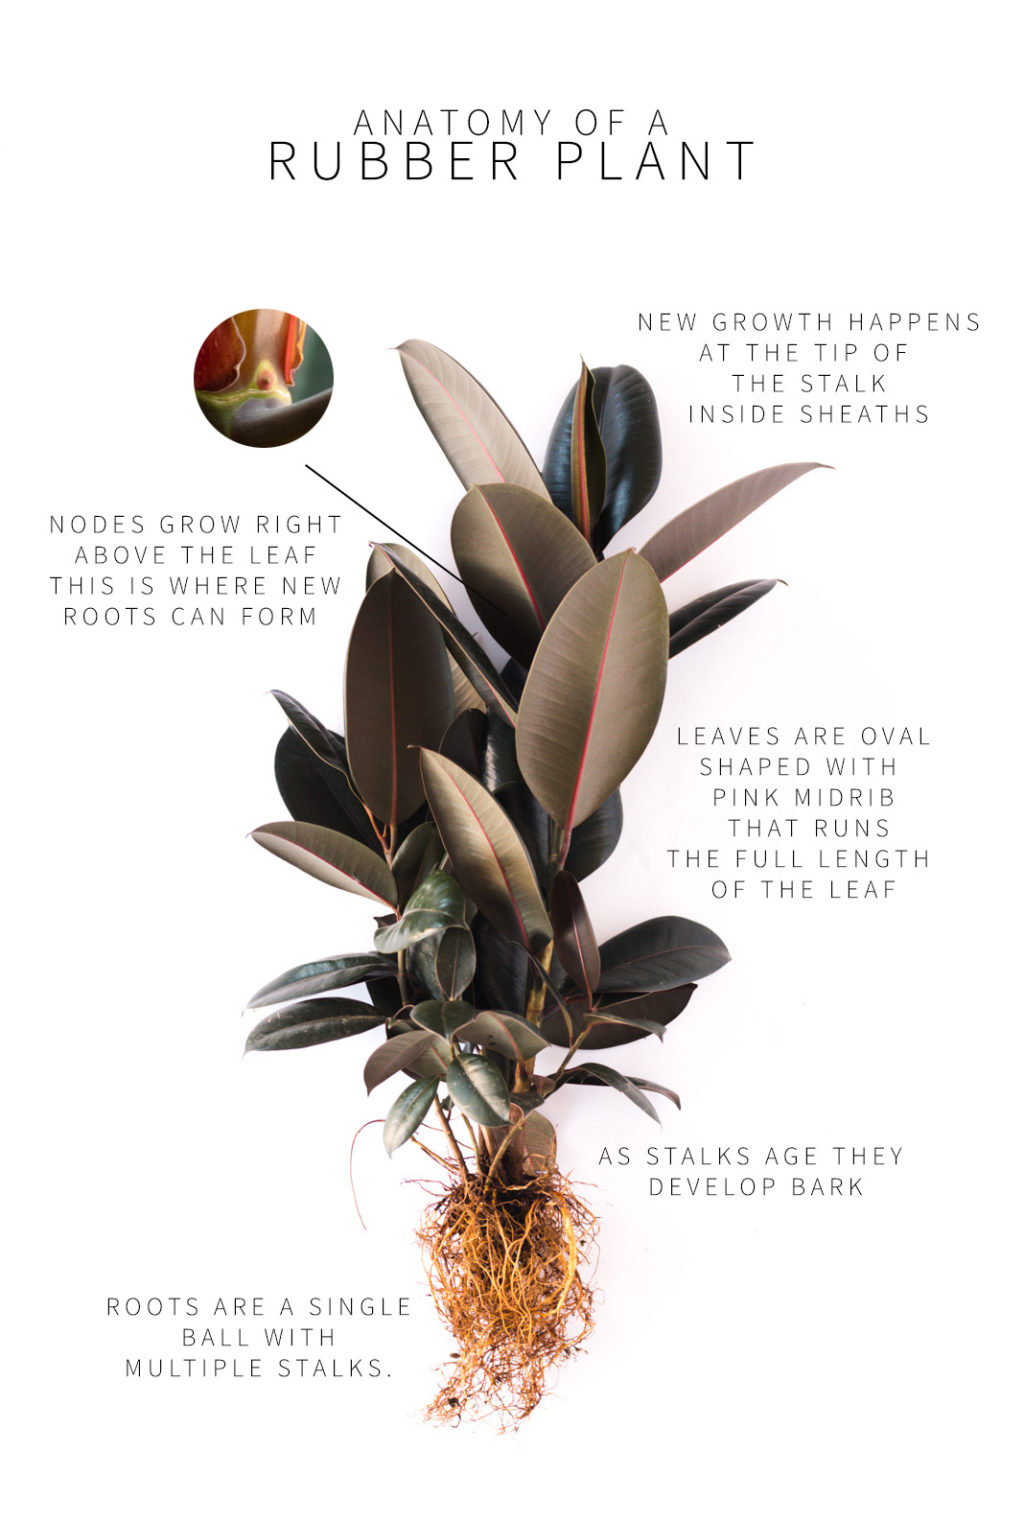
- Trim Back Excessive Growth: If certain branches are overcrowded or too long, trim them back to a node or where a new leaf is emerging.
- Sanitize Tools Between Cuts: Dip your tools in a mild bleach solution to avoid spreading any potential diseases between cuts.
- Promote Air Circulation: Thinning crowded branches helps improve air flow, reducing the risk of fungal diseases.
For more on rubber plant care, check our rubber plant pruning article.
Addressing Brown Spots
Brown spots on your rubber plant leaves can indicate overwatering, underwatering, or pest infestations like scale or spider mites, causing damage that appears as brown spots. Often, overwatering is the primary cause of these spots. Here are steps to address and prevent brown spots:
-
Identify the Cause:
- Overwatering: Ensure the soil has adequate drainage and adjust your watering schedule.
- Underwatering: Increase watering frequency but avoid saturation.
- Pests: Treat with appropriate pesticides if pests are detected.
-
Improve Drainage:
- Use pots with drainage holes.
- Avoid using heavy soil that retains water. Consider lighter, well-draining soil, such as a rubber plant soil mix.
-
Repotting:
- If overwatering has caused root rot, trim off mushy roots and repot in fresh, well-draining soil.
- Consider using a fungicide to treat the remaining roots before repotting (Fig & Bloom).
-
Regular Inspection:
- Check your plant regularly for signs of stress or disease.
- Prune any leaves showing severe damage to prevent the spread of issues.
Managing leaf issues prevents further stress and ensures a thriving rubber plant. For more detailed symptoms and remedies, visit our rubber plant brown spots page.
Healthy Growth Strategies
Encouraging New Growth
Pruning dead or dying branches of a rubber plant encourages new growth and helps maintain a balanced structure. By thinning out crowded areas, light penetration and air flow are increased, which strengthens the plant. Regular pruning, as noted in the Greg App, is essential for overall health and vigor.
| Pruning Action | Benefit |
|---|---|
| Remove dead branches | Encourages new, healthy growth |
| Thin crowded areas | Increases light and air flow |
| Cut back to mature growth | Promotes robust branching |
It’s important to focus on the top of the plant when pruning, as leaves will only regrow from the top, not the lower parts. To make the plant look fuller, consider replanting smaller stalks near larger ones.
For more tips on pruning, visit our guide on rubber plant pruning.
Propagation and Pruning
Rubber Plants propagate easily from nodes, either in water or soil. Here’s a quick guide on how to propagate:
- Select a Healthy Cutting: Choose a section of the plant that includes a portion of the stalk and a leaf.
- Prepare the Cutting: Make a clean cut just below a node.
- Root the Cutting: Place the cutting in water or soil. Ensure the node is submerged.
| Method | Duration for Roots to Develop |
|---|---|
| Water | Approximately 4-6 weeks |
| Soil | Approximately 6-8 weeks |
Cuttings will take a few months to root fully. Make sure to change the water regularly if propagating in water.
To learn more about propagation and ensuring the health of your plants, explore our resources on rubber plant propagation and proper pruning techniques to maximize your plant’s growth and appearance.


