Understanding Rubber Plant Brown Spots
Causes of Brown Spots
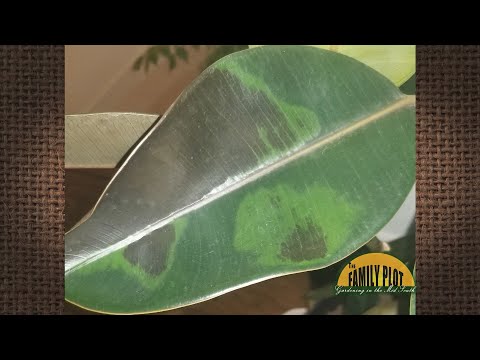
Brown spots on Rubber Plant leaves can be a concern for many gardeners. These spots can arise from a variety of causes, often signaling issues that need immediate attention. One of the most common causes is overwatering, which can lead to poor drainage. When the soil becomes waterlogged, it creates a swampy environment that can cause dry, crispy patches or soggy, darkened areas on the leaves (Gregarious).
| Cause | Description |
|---|---|
| Overwatering | Leads to poor drainage, causing dry patches or soggy areas |
| Nutrient Deficiencies | Results from an imbalance in fertilization, leading to manifest brown spots |
| Fungal/Bacterial Issues | Often identified by yellow or black halos around spots, can lead to more severe issues like mold or pests |
Nutrient deficiencies can also manifest as brown spots. These deficiencies indicate that your rubber plant may need balanced fertilization to thrive. To learn more about maintaining the appropriate nutrient levels, visit our article on rubber plant fertilizer.
Signs of Fungal or Bacterial Issues
Fungal and bacterial issues are another significant cause of brown spots on your Rubber Plant leaves. These issues often present themselves as yellow or black halos around the brown spots. Severe cases can lead to entire leaves turning black, which may signify the presence of mold or pests (Gregarious).
Understanding the symptoms can help in timely intervention and treatment. Many leaf spot pathogens are primarily active in the leaf tissue but can also cause blight or cankers of twigs (University of Minnesota Extension).
| Symptom | Indicator |
|---|---|
| Yellow/Black Halos Around Spots | Indicates fungal or bacterial issues |
| Leaves Turning Black | Sign of severe issues, possibly mold or pests |
| Leaf and Shoot Blight | Pathogens causing blight or cankers on twigs, such as Aschochyta blight on lilac and Venturia on Poplar |
By recognizing these signs early, you can take appropriate measures to manage and prevent further damage to your rubber plant. For more on various diseases that can afflict your rubber plant, check out our section on rubber plant diseases.
Understanding and diagnosing these issues is crucial for maintaining the health and beauty of your rubber plant. For comprehensive care tips, explore our guides on specific varieties like burgundy rubber tree care and tineke rubber tree care.
Addressing Overwatering
Overwatering is a common issue for rubber plants that can lead to the development of brown spots on their leaves. Addressing overwatering involves understanding its effects and implementing corrective measures to ensure the health of your plant.
Effects of Overwatering
Overwatering can cause several issues for your rubber plant, leading to a range of symptoms. When the soil remains too wet for prolonged periods, it can result in root rot and other complications:
- Brown Spots on Leaves: Excessive water can create swamp-like conditions in the soil, leading to brown spots on the leaves. These can be either dry and crispy or soggy and dark (Gregarious).
- Wilting Leaves: Overwatered plants often exhibit wilting leaves, even though the soil is saturated.
- Stunted Growth: Your plant may struggle to grow, leading to overall stunted development.
- General Appearance: The plant may look unhealthy, displaying signs of distress and despair.
| Symptom | Possible Cause |
|---|---|
| Brown spots on leaves | Overwatering |
| Wilting leaves | Root rot due to excess water |
| Stunted growth | Poor drainage |
| Unhealthy appearance | Excessive soil moisture |
For more on addressing these issues, visit our guide on rubber plant overwatered.
Correcting Overwatering Issues
To rectify overwatering issues and prevent brown spots on your rubber plant, follow these steps:
- Check Drainage: Ensure your plant’s pot has adequate drainage. Holes at the bottom of the pot can help excess water escape, preventing the soil from becoming waterlogged.
- Adjust Watering Schedule: Water your rubber plant only when the top inch of soil is dry to the touch. Overwatering can be avoided by creating a schedule that matches your plant’s needs. For more watering tips, see rubber plant watering.
- Improve Soil: Use a well-draining soil mix to encourage proper water flow. You can learn more about the best soil mixes for rubber plants at rubber plant soil mix.
- Repot if Necessary: If your plant is suffering from severe overwatering, repotting it in fresh soil can help revive it. This also includes trimming away any rotten roots to prevent further damage (Fig & Bloom).
For a comprehensive guide on dealing with overwatering stress in plants, visit our article on rubber plant root rot.
Dealing with Underwatering
Impact of Underwatering
Underwatering can lead to significant issues for your rubber plant, including the appearance of brown spots on its leaves. When a rubber plant is not sufficiently watered, it experiences stress and thirst, which negatively affects its overall health. This condition can be identified by checking the top inch of the soil. If it’s dry, your plant likely needs hydration (Gregarious).
| Symptom | Cause |
|---|---|
| Brown Spots on Leaves | Underwatering |
| Dry Soil | Lack of Water |
| Wilting Leaves | Dehydration |
Resolving Underwatering Concerns
To address underwatering issues and ensure the health of your rubber plant, follow these steps:
-
Check Soil Moisture: Regularly inspect the top inch of soil. It should be slightly moist but not soaked. Using a moisture meter can help monitor the soil’s hydration levels.
-
Watering Schedule: Establish a consistent watering schedule. Typically, watering once a week is suitable for rubber plants, but this can vary based on factors like pot size, humidity, and light conditions.
-
Deep Watering: Ensure that when you water the plant, it receives a deep and thorough watering. The water should reach the plant’s roots, not just the surface. Be cautious of overwatering; adequate drainage holes in the pot are essential to prevent waterlogging (Fig & Bloom).
-
Mulching: Apply a layer of mulch around the base of your rubber plant. Mulching helps retain moisture in the soil and prevents it from drying out quickly.
-
Environmental Adjustments: Ensure your plant is placed in an environment with stable humidity levels and indirect sunlight. High temperatures can accelerate soil drying, requiring more frequent watering.
If you observe persistent brown spots even after correcting the watering routine, consider checking for other underlying issues such as nutrient deficiencies or leaf spot diseases. For comprehensive guidance on rubber plant care, including tips for pruning and suitable fertilizers, explore our related articles.
Ensuring consistent and adequate watering is key to maintaining the health of your rubber plant and preventing brown spots from reappearing.
Nutrient Deficiencies
Nutrient deficiencies can cause serious issues for your rubber plant, including the development of brown spots on the leaves. Addressing these deficiencies is crucial for maintaining the health and appearance of your plant.
Identifying Nutrient Deficiencies
One of the common signs of nutrient deficiencies in rubber plants is the appearance of brown spots on the leaves (Gregarious). These spots indicate that your plant might be lacking essential nutrients, such as nitrogen, phosphorus, or potassium. Understanding these deficiencies can help you take the appropriate action.
| Nutrient Deficiency | Symptoms |
|---|---|
| Nitrogen | Yellowing leaves, stunted growth |
| Phosphorus | Dark green or reddish leaves, delayed growth |
| Potassium | Brown edges, curling leaves |
To accurately diagnose nutrient deficiencies, observe the pattern of discoloration and the overall growth of your plant. If your rubber plant exhibits any of these symptoms, it may be suffering from a lack of specific nutrients.
Fertilization for Healthy Plants
To correct nutrient deficiencies and promote healthy growth, regular fertilization is essential. Use a balanced fertilizer to ensure your rubber plant receives all the necessary nutrients. Here are some guidelines for fertilization:
-
Choose a Balanced Fertilizer: Select a fertilizer with an equal ratio of nitrogen, phosphorus, and potassium (e.g., 10-10-10). This ensures that your plant gets a well-rounded diet.
-
Follow the Recommended Dosage: Over-fertilizing can lead to further issues, including root burn. Always follow the instructions on the fertilizer package.
-
Fertilize During the Growing Season: Apply fertilizer during the active growing season (spring and summer) for optimal uptake. Reduce fertilization during the dormant months (fall and winter).
-
Water Thoroughly After Fertilization: Watering helps to distribute the nutrients evenly throughout the soil, ensuring that they reach the roots.
For specific guidelines on fertilization, refer to our detailed article on rubber plant fertilizer.
Proper fertilization can prevent issues such as rubber plant leaves turning brown and ensure your plant remains vibrant and healthy. Nutrient deficiencies can also lead to issues like rubber plant leaves curling or rubber plant not growing, so regular feeding is crucial. By following these steps, you can keep your rubber plant in top shape and enjoy its lush, green foliage for years to come.
Handling Leaf Spot Diseases
Addressing leaf spot diseases in rubber plants is critical for maintaining healthy foliage. Understanding the types and treatments of these diseases can help you keep your plant thriving.
Types of Leaf Spot Diseases
Leaf spot diseases are primarily caused by fungal or bacterial pathogens. Common pathogens include Septoria, Anthracnose, and Phyllosticta, each manifesting unique symptoms. Infections typically start as small brown spots and can escalate to larger blights or cankers (University of Minnesota Extension).
| Disease | Pathogen | Symptoms |
|---|---|---|
| Septoria Leaf Spot | Septoria spp. | Small brown spots, potential cankers on twigs |
| Anthracnose | Colletotrichum spp. | Dark sunken spots, leaf blight |
| Phyllosticta Leaf Spot | Phyllosticta spp. | Circular spots with halo, potential leaf drop |
| Ascochyta Blight | Ascochyta spp. | Brown spots progressing to blight (University of Minnesota Extension) |
| Venturia Shoot Blight | Venturia spp. | Leaf spots, shoot blight (University of Minnesota Extension) |
Prevention and Treatment
Preventing and treating leaf spot diseases involves several steps to ensure your rubber plant remains healthy. Here are some effective strategies:
-
Proper Sanitation: Remove and dispose of infected leaves to prevent the spread of pathogens. Clean tools regularly to avoid contamination.
-
Adequate Spacing: Ensure proper air circulation around your rubber plant by not overcrowding. This reduces humidity and minimizes fungal growth.
-
Watering Practices: Water the soil directly rather than the foliage. Overhead watering can create a moist environment conducive to pathogen proliferation. For more guidance, visit our rubber plant watering article.
-
Fungicides: Apply appropriate fungicides if an infection is detected. Always follow the manufacturer’s instructions for safe and effective use.
-
Resistant Varieties: Choose rubber plant varieties known for their resistance to leaf spot diseases. Refer to rubber plant types for more information on different varieties.
-
Monitor and Inspect: Regularly inspect your rubber plant for early signs of disease. Early intervention can prevent the spread and severity of infections.
By adopting these prevention and treatment strategies, you can protect your rubber plant from the adverse effects of leaf spot diseases. Maintain an environment conducive to the plant’s health by considering factors such as rubber plant light requirements and rubber plant soil mix. For further detailed care, check out our resources on rubber plant leaf curling and rubber plant fertilizer.
Environmental Factors
The environment in which you place your rubber plant is essential to its health and can greatly impact the presence of brown spots on the leaves. Two crucial aspects to consider are light requirements and potential toxicity to pets and humans.
Light Requirements
Rubber plants thrive in bright, indirect light. Direct sunlight can cause leaf burn, leading to brown spots and other damage. Ideally, situate your plant in a spot where it gets ample indirect light, but avoid prolonged exposure to direct sunlight.
In conditions of lower light, rubber plants can adapt. However, they may develop an elongated, sparse appearance. This adaptation often necessitates changes in your watering routine to prevent issues like overwatering or underwatering, which can also cause brown spots. For more detailed guidelines on light requirements, visit our page on rubber plant light requirements.
| Light Condition | Effect on Rubber Plant |
|---|---|
| Bright, Indirect Light | Optimal growth, healthy leaves |
| Direct Sunlight | Leaf burn, brown spots |
| Low Light | Sparse, elongated growth |
Toxicity to Pets and Humans
Rubber plant leaves and sap are mildly toxic to both pets and humans. Ingesting the leaves can lead to mouth and stomach irritation, vomiting, and, in some cases, more severe gastrointestinal distress. Contact with the sap can cause skin irritation (How Many Plants).
If you have pets or small children, it is essential to place your rubber plant out of reach to prevent accidental ingestion or skin contact. For pet owners specifically, you can read more on the rubber plant toxic to cats or rubber plant toxic to dogs.
| Affected Group | Symptoms |
|---|---|
| Pets | Mouth and stomach irritation, vomiting |
| Humans | Skin irritation, stomach issues |
By understanding and managing these environmental factors, you can significantly reduce the occurrence of brown spots on your rubber plant leaves. For further tips and insights, explore more on rubber plant care in winter and rubber plant overwatered.


