Care Tips for Spider Plants
Temperature and Repotting
Spider plants thrive when grown in temperatures consistently above 45°F, with an ideal range between 65°F and 75°F (Real Simple). It’s important to repot spider plants approximately every two years to prevent them from becoming root-bound and to provide fresh soil.
For more detailed information on repotting, visit our guide on spider plant repotting.
Light Preferences and Conditions
Spider plants prefer bright to moderate indirect sunlight. They can adapt to varying light conditions but will perform best with indirect light. Direct sunlight can cause leaf burn, so it’s critical to keep them out of direct rays.
| Light Level | Recommendation |
|---|---|
| Low Light | Less frequent watering |
| Bright Indirect Light | Water more often |
For additional details on light preferences, read our article on spider plant light requirements.
Watering Guidelines and Mistakes
Water spider plants when the top 2 inches of soil are dry. Avoid watering during peak sunlight to prevent leaf burn. Overwatering can lead to root rot, a common issue among spider plants. It’s safer to underwater than overwater.
| Season | Watering Frequency |
|---|---|
| Summer | Every few days |
| Winter | Once a week or more |
For advice on avoiding common mistakes, see our section on spider plant root rot.
By following these guidelines, gardeners can ensure their spider plants remain healthy and vibrant all year round. For general care advice, explore more on spider plant care.
Winter Care for Spider Plants
Spider plants require special attention during the winter months to ensure they remain healthy and vibrant. Two crucial aspects to consider are winter temperature considerations and indoor winter maintenance.
Winter Temperature Considerations
Spider plants thrive in temperatures between 65 and 75°F (Gardener’s Path). As temperatures start to drop, these plants should be brought indoors to avoid frost or extreme cold. They are not winter hardy in regions like the UK and may stop growing at temperatures as low as 10°C (Plantura).
For optimal spider plant care in winter, avoid exposing the plants to prolonged temperatures below 55°F. Check the table below for ideal temperature ranges:
| Temperature (°F) | Condition |
|---|---|
| 65 – 75 | Optimal |
| 55 – 65 | Acceptable but requires close monitoring |
| Below 45 | Needs to be brought indoors immediately |
For more details on temperature tolerance, see our guide on spider plant temperature tolerance.
Indoor Winter Maintenance
Once indoors, spider plants still require proper care to thrive through the winter. Here’s a checklist to follow:
-
Light Conditions: Place the spider plant in a location that receives good sunlight but avoid direct sun exposure to prevent leaf scorch (Almanac). Refer to our article on spider plant light requirements for more insights.
-
Watering: Spider plants should be watered less frequently during the winter. Overwatering can lead to issues like root rot. Water only when the top inch of soil is dry.
-
Fertilization: Do not fertilize spider plants during the winter months. Resume fertilization as the weather warms up in March (Plantura). For detailed fertilizing techniques, see our guide on spider plant fertilizer.
-
Maintenance: Keep the spider plant in a cooler but bright room. Over time, pruning might be necessary to remove any unhealthy leaves. Learn more about pruning in our article on spider plant pruning.
Spider plants can survive varying conditions and are adaptable to changes in the environment. By following these guidelines for indoor winter maintenance, you can ensure your spider plant remains healthy and ready to thrive come spring.
For more information on seasonal transitions and care differences, read our section on seasonal care for spider plants.
Propagation and Offsets
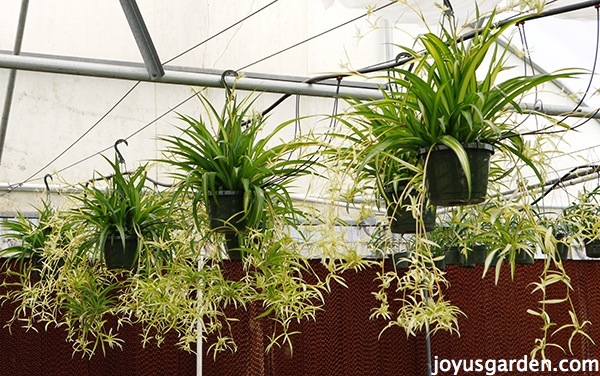
Spider plants propagate through offsets, commonly known as “pups.” These baby plants can be nurtured and grown into mature plants. Here’s a comprehensive guide on the propagation process and care for baby spider plants.
Propagation Process
Spider plants produce offsets, also called spiderettes or pups, which can be propagated to grow new plants. Here are the steps for successfully propagating spider plant pups:
-
Identify Healthy Pups: Choose strong and healthy pups from your spider plant. They should have well-formed leaves and visible tiny roots.
-
Separating the Offsets: You can either let the pups root themselves into soil placed next to the mother plant or carefully cut them off with clean scissors if they already have a root system.
-
Preparing the Soil: Use lightweight, easily drainable soil. Adding orchid bark or peat moss at the bottom of the pot can help with drainage (Real Simple).
-
Planting the Pups: Place the pup in its container filled with prepared soil. Ensure only the roots are buried, leaving the plant’s crown above the soil.
-
Watering: Water the new plants lightly, ensuring the soil is moist but not waterlogged. Avoid letting the plant sit in standing water to prevent root rot.
-
Initial Care: Place the newly potted pups in a location with indirect sunlight. Maintain a consistent temperature above 45 °F (Real Simple).
Baby Spider Plant Care
Once the pups are planted and have established roots, they require some care to ensure they thrive. Here are some tips for baby spider plant care:
-
Light and Temperature: Baby spider plants prefer bright, indirect light. Avoid direct sunlight, which can scorch their delicate leaves. Keep them in an environment where the temperature stays above 45 °F.
-
Watering: Monitor the soil moisture regularly. Water when the top inch of the soil feels dry. Overwatering can lead to root rot, so ensure the soil is well-drainable.
-
Humidity: Spider plants enjoy moderate humidity. If the indoor air is dry, especially during winter, consider using a humidifier or placing a water tray near the plants.
-
Feeding: Use a balanced houseplant fertilizer every month during the growing season (spring and summer). For winter care, you may reduce feeding as plant growth slows down.
| Care Aspect | Requirement |
|---|---|
| Light | Bright, indirect light |
| Temperature | Above 45 °F |
| Watering | When top inch of soil is dry |
| Humidity | Moderate |
| Feeding | Monthly during growing season |
For more tips and detailed instructions on spider plant propagation and caring for offsets, visit our comprehensive guides. Moreover, if you encounter any issues like spider plant leaves curling or spider plant yellow leaves, our troubleshooting articles can provide valuable insights.
Common Issues and Solutions
Yellow Leaves and Overwatering
Spider plants are particularly prone to yellow leaves, often caused by overwatering. It’s essential to find the right balance in watering practices. Spider plants require lightly moist soil, especially during the growing season. Overwatering can lead to root rot, making it better to underwater than to overwater. Watering frequency should vary between a few days in summer to more than a week in colder months.
Signs of Overwatering and Solutions:
| Symptoms | Potential Cause | Solution |
|---|---|---|
| Yellow Leaves | Overwatering | Allow soil to dry out between waterings |
| Soft, Mushy Roots | Root Rot | Remove affected roots, repot with fresh soil |
For detailed care tips, visit our page on spider plant root rot.
Brown Leaves and Tap Water
Brown leaf tips on spider plants are commonly caused by minerals and fluoride present in tap water (Garden Betty). These plants are sensitive to such compounds, leading to leaf damage over time.
Preventing Brown Leaves:
- Use distilled or rainwater instead of tap water.
- Flush the soil regularly to remove any accumulated mineral deposits.
Symptoms and Treatments:
| Symptoms | Potential Cause | Solution |
|---|---|---|
| Brown Leaf Tips | Tap Water Minerals | Switch to distilled water, flush soil |
For further information, check our detailed guide on spider plant brown tips.
Pest Infestations
Spider plants can also fall victim to various pest infestations, including aphids, spider mites, and mealybugs. A common and effective treatment is the application of neem oil (Real Simple).
Managing Pest Infestations:
- Regularly inspect the plant for signs of pests.
- If pests are detected, gently wash the plant and apply neem oil or insecticidal soap.
Table of Common Pests and Solutions:
| Pest | Symptoms | Treatment |
|---|---|---|
| Aphids | Sticky residue, curled leaves | Apply neem oil, wash plant with water |
| Spider Mites | Fine webbing, yellow speckled leaves | Increase humidity, apply insecticidal soap |
| Mealybugs | White, cottony masses on plant | Remove with alcohol-soaked cotton swab, apply neem oil |
To learn more about dealing with plant pests, refer to our page on spider plant pest infestations.
Addressing common issues like yellow leaves, brown leaf tips, and pest infestations can help maintain the health and vitality of your spider plant, especially during the winter months. Proper care adjustments and regular maintenance play a crucial role in keeping your plant happy and thriving. For further reading, browse our articles on spider plant yellow leaves and spider plant leaves turning brown.
Seasonal Care for Spider Plants
Understanding the distinct care requirements for your spider plants across different seasons is crucial for their well-being. Here, we will discuss how to navigate seasonal transitions and highlight the differences between summer and winter care.
Seasonal Transitions
Spider plants are adaptable to various conditions, and handling seasonal transitions properly ensures their continued health.
-
Spring to Summer: As temperatures rise, spider plants wake from their semi-dormant state. Increase watering frequency and begin fertilizing regularly to support new growth.
-
Summer to Fall: Reduce fertilization and watering gradually as the plant prepares for cooler temperatures. Inspect plants for any pests or diseases before bringing them indoors.
-
Fall to Winter: Spider plants stop growing at temperatures as low as 10°C (Plantura). Move them to a bright, cooler room indoors. Cut back on watering and stop fertilizing.
Summer vs. Winter Care Differences
Understanding the distinct care requirements for summer and winter helps in providing the optimal environment for your spider plants year-round.
| Care Aspect | Summer | Winter |
|---|---|---|
| Temperature | Thrives in warm temperatures. Keep above 15°C (Quora) | Maintain indoor temperatures, avoid below 10°C (Plantura) |
| Watering | Water more frequently, allow soil to dry slightly between watering | Water occasionally, soil should be dry to touch (no sogginess) |
| Fertilization | Monthly feeding with a balanced fertilizer (spider plant fertilizer) | No fertilization in winter months |
| Light | Prefers bright, indirect sunlight (spider plant sunlight) | Bright but cooler locations, avoid direct exposure from heaters |
| Humidity | Maintain average indoor humidity, no special requirements | Increase humidity if indoor air is particularly dry (spider plant humidity) |
For comprehensive insights into spider plant care, summer vs winter care differences, and year-round maintenance, explore our related articles and resources. This seasonal guide ensures your beloved spider plants stay lush and vibrant throughout the year regardless of the changing weather conditions.
Additional Tips and Recommendations
Humidity Preferences
Spider plants are relatively adaptable when it comes to humidity levels, making them a great choice for indoor setups. They can thrive in the average home environment, even if the air is a bit dry. However, in extremely arid conditions, misting the plant can help maintain its health.
- Ideal Relative Humidity: 25% – 49% (Gardener’s Path)
Spider plants’ ability to tolerate a range of humidity conditions makes them perfect for varied indoor climates. To enhance their well-being, misting can be an additional step, particularly if the indoor air is dry.
| Humidity Level | Action |
|---|---|
| < 25% | Mist Regularly |
| 25% – 49% | No Special Requirements |
| > 49% | Monitor For Over-Humidification |
Explore more on spider plant humidity.
Fertilizing Techniques
Fertilizing spider plants is essential for their healthy growth, particularly during their active growing seasons from March to October. A well-chosen fertilizer can promote lush, full foliage. It’s advisable to use a potassium-rich NK liquid fertilizer to aid in their growth while avoiding excess nitrogen, which can lead to overly soft and long shoots prone to pest issues.
- Frequency: Every 2-4 weeks from March to October.
- Fertilizer Type: Potassium-rich NK liquid fertilizer.
- Warnings: Avoid overuse of nitrogen.
Check out detailed advice on spider plant fertilizer.
Pruning and Maintenance
Pruning your spider plant is an important aspect of its care and maintenance. Although spider plants do not require extensive pruning, certain tasks can help keep them healthy and attractive. You might need to prune away withered flowers to prevent the plant from forming seeds, which are toxic. Pruning also includes managing offshoots, commonly known as spiderettes or pups, which can be used for propagation.
- Withered Flowers: Remove to prevent formation of poisonous seeds.
- Spiderettes: Cut and propagate.
- Browning Leaves: Trim browned tips or completely remove withered leaves using clean scissors.
Regular pruning helps manage the plant’s aesthetics and health. For more detailed guidance, see our article on spider plant pruning.
By keeping these additional tips in mind, you can ensure that your spider plant remains healthy and vibrant throughout the winter and beyond.


