Growing Rubber Plants in Water
Growing a rubber plant in water can be a rewarding and unique way to cultivate this popular houseplant. Understanding the essentials and nutrient requirements for water-grown plants is key to ensuring their growth and health.
Essentials for Water-Grown Plants
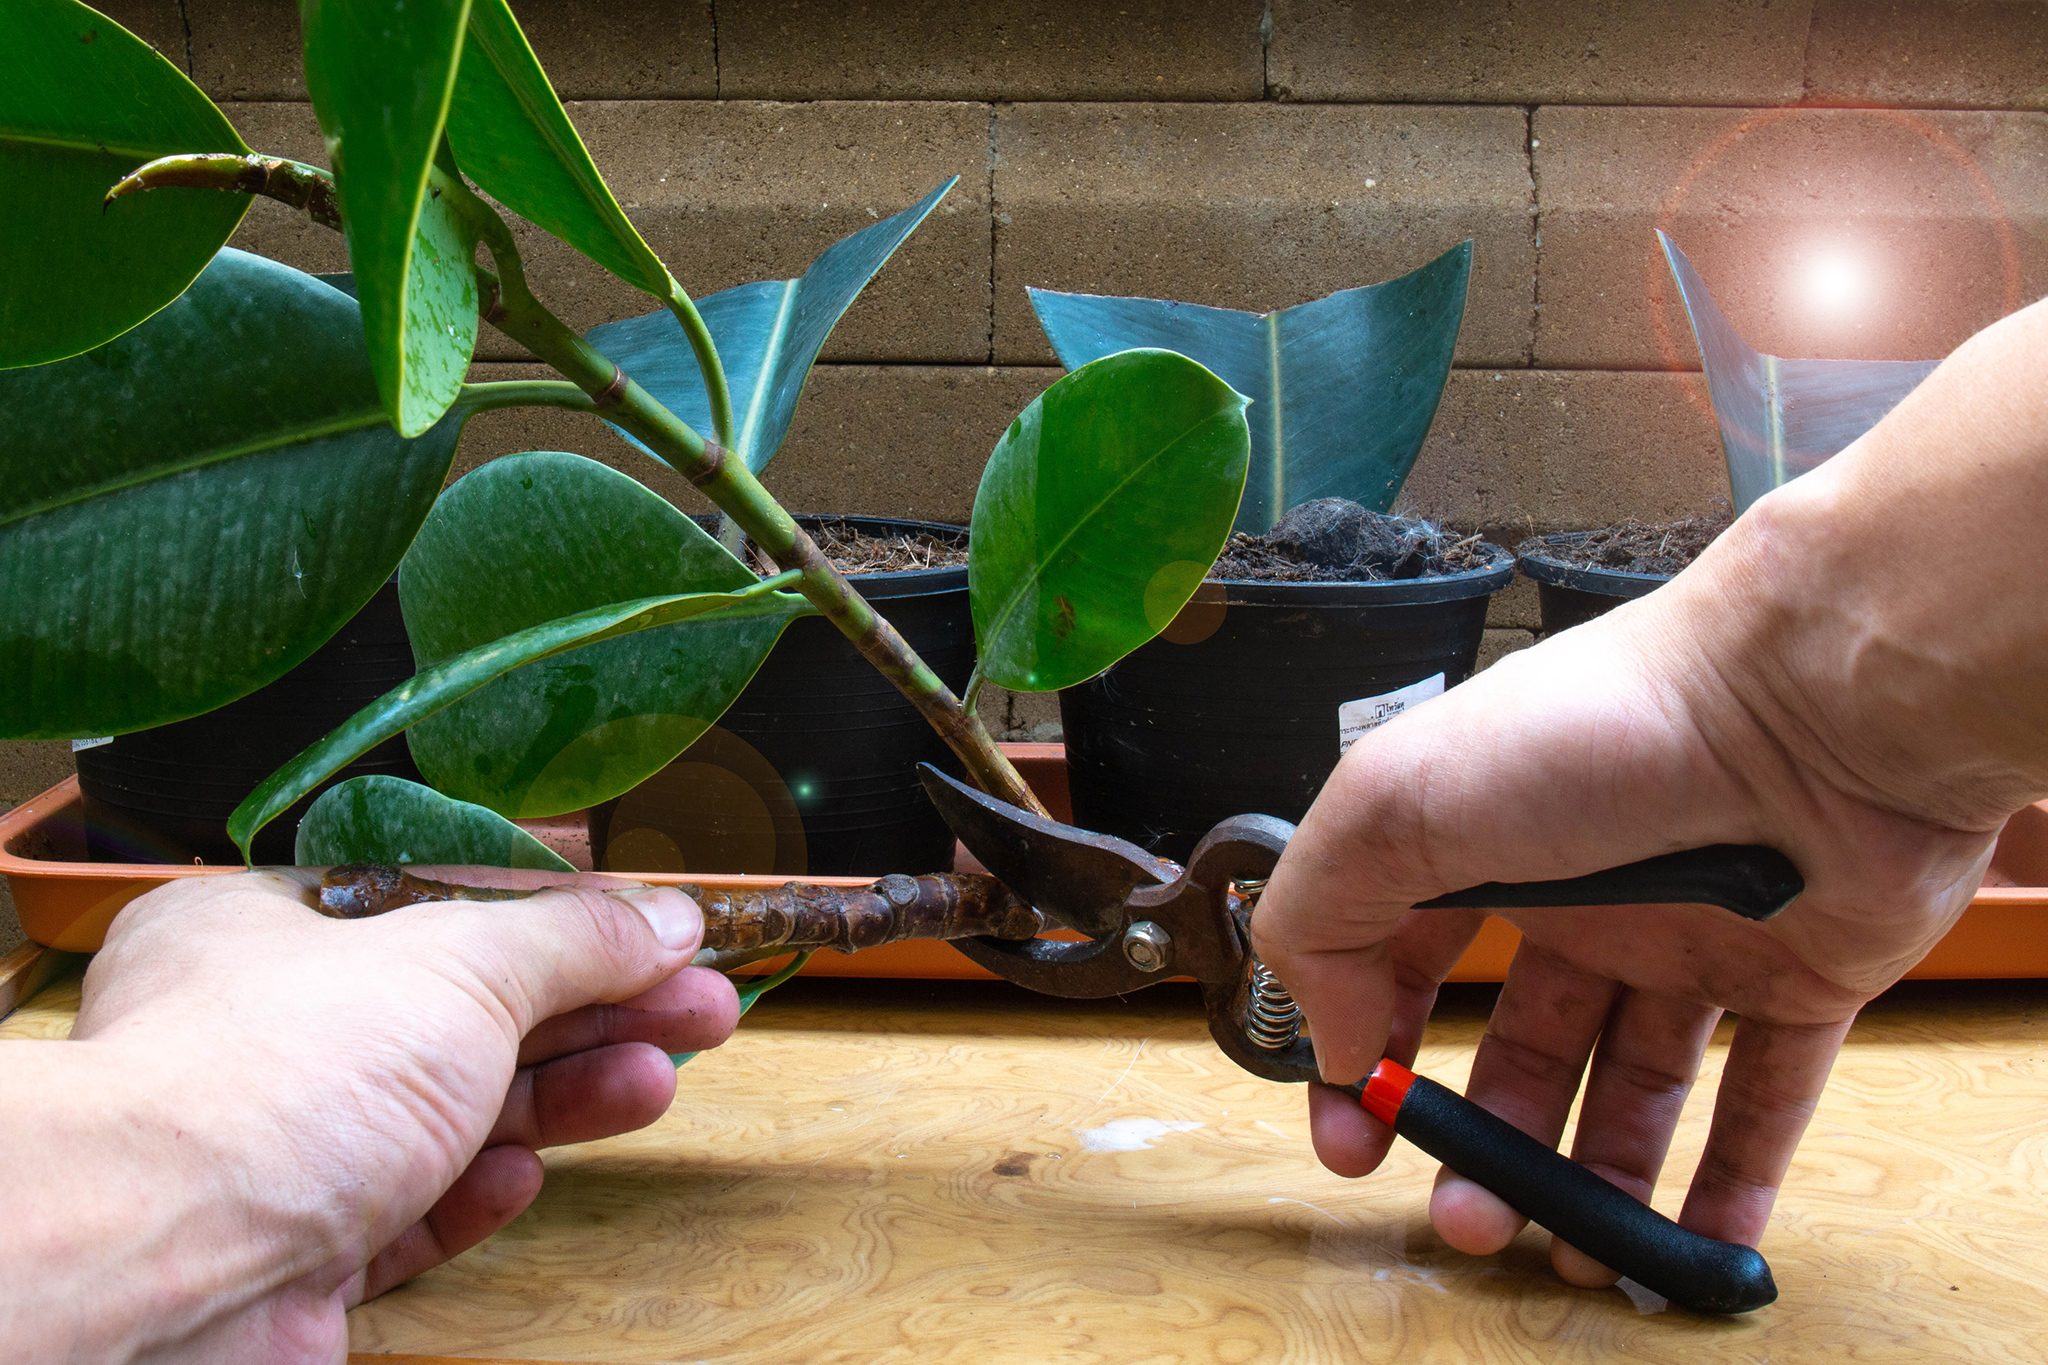
To successfully grow a rubber plant in water, it’s important to start with a healthy cutting. Cut a section of the plant right above a leaf at a diagonal, then place the cut stem in a clear vase or jar filled with room temperature water. Over time, roots will start to form, which can take about a month. Here are some essentials to keep in mind:
- Water Quality: Use bottled spring water, rainwater, or well water, as city water is often heavily chlorinated and lacks the natural nutrients plants need.
- Light: Although rubber plants are low light tolerant, they thrive with plenty of direct sunlight. Placing them near a window that receives substantial sun exposure is ideal (Espoma).
- Vessel: Use a clear container to monitor root growth and water clarity.
- Water Changes: Change the water every four to six weeks, or sooner if you notice the water level dropping significantly.
Nutrient Requirements for Water-Grown Plants
Feeding your rubber plant in water requires adding a good quality, water-soluble fertilizer to the container when you change the water. Here are the steps to ensure your plant gets the nutrients it needs:
- Fertilizer Strength: Use a weak solution, one-quarter the strength recommended on the fertilizer container (Gardening Know How).
- Frequency: Add the fertilizer every time you change the water, typically every four to six weeks.
- Monitoring: Keep an eye on the plant for signs of nutrient deficiency, such as yellowing leaves, and adjust the fertilizing schedule as needed.
| Nutrient | Recommended Solution Strength | Frequency of Application |
|---|---|---|
| Water-Soluble Fertilizer | 1/4 of the recommended strength | Every 4-6 weeks |
Ensuring that your rubber plant gets the right nutrients and proper care will help it thrive in a water-based environment. For more on rubber plant care, check out our articles on rubber plant watering and rubber plant light requirements.
Care Tips for Rubber Plants
To keep your rubber plant healthy and thriving, it’s important to follow some essential care guidelines. This includes proper watering techniques, understanding light requirements, and choosing the ideal potting mix.
Proper Watering Techniques
Rubber plants need to dry out sufficiently between waterings. The exact frequency depends on the size of the pot and the specific conditions in your home. For instance, in a 15-inch pot, you should allow the top quarter of the soil to dry out before watering again (Espoma). Over-watering can lead to issues like root rot, so it’s crucial to find the right balance. If you’re unsure about how to water your plant correctly, refer to our guide on rubber plant watering.
| Pot Size (inches) | Watering Interval |
|---|---|
| 6 | 5-7 days |
| 10 | 7-10 days |
| 15 | 10-14 days |
For additional tips on preventing over-watering, visit rubber plant overwatered.
Light Requirements for Rubber Plants
Rubber plants thrive when placed close to bright, sunny windows. They should be positioned less than 1 foot away from a south-facing window to maximize growth potential (Greg). Despite being labeled as low-light plants, rubber plants are actually low-light tolerant and benefit significantly from plenty of direct sunlight. For comprehensive details on light needs, visit rubber plant light requirements.
| Light Condition | Recommendation |
|---|---|
| Low Light | Tolerant, but not ideal |
| Indirect Light | Preferred |
| Direct Sunlight | Highly beneficial |
To understand how light affects the health and appearance of your rubber plant, explore our resource on rubber plant leaves curling.
Ideal Potting Mix for Rubber Plants
Rubber plants prefer dry environments and require well-draining soil that contains organic matter. A well-draining, all-purpose potting mix works best. Adding perlite or orchid mix can enhance aeration (Espoma). A recommended mix is three parts all-purpose potting mix and one part perlite. Annual refreshing of the potting soil ensures your plant gets the necessary nutrients for robust growth.
| Component | Ratio |
|---|---|
| All-Purpose Potting Mix | 3 parts |
| Perlite | 1 part |
If you need specific instructions on soil composition, check out our article on rubber plant soil.
By adhering to these care tips—proper watering, adequate light, and the appropriate potting mix—you can ensure that your rubber plant remains healthy and vibrant. For more advice on tineke rubber tree care or rubber plant repotting, visit our related articles.
Propagating Rubber Plants
Propagation is an effective method to increase the number of your beloved rubber plant species. There are two main techniques: propagation in water and air layering with node cuttings. Both methods have their own merits, and understanding them will help you choose the best approach for your gardening needs.
Propagation in Water
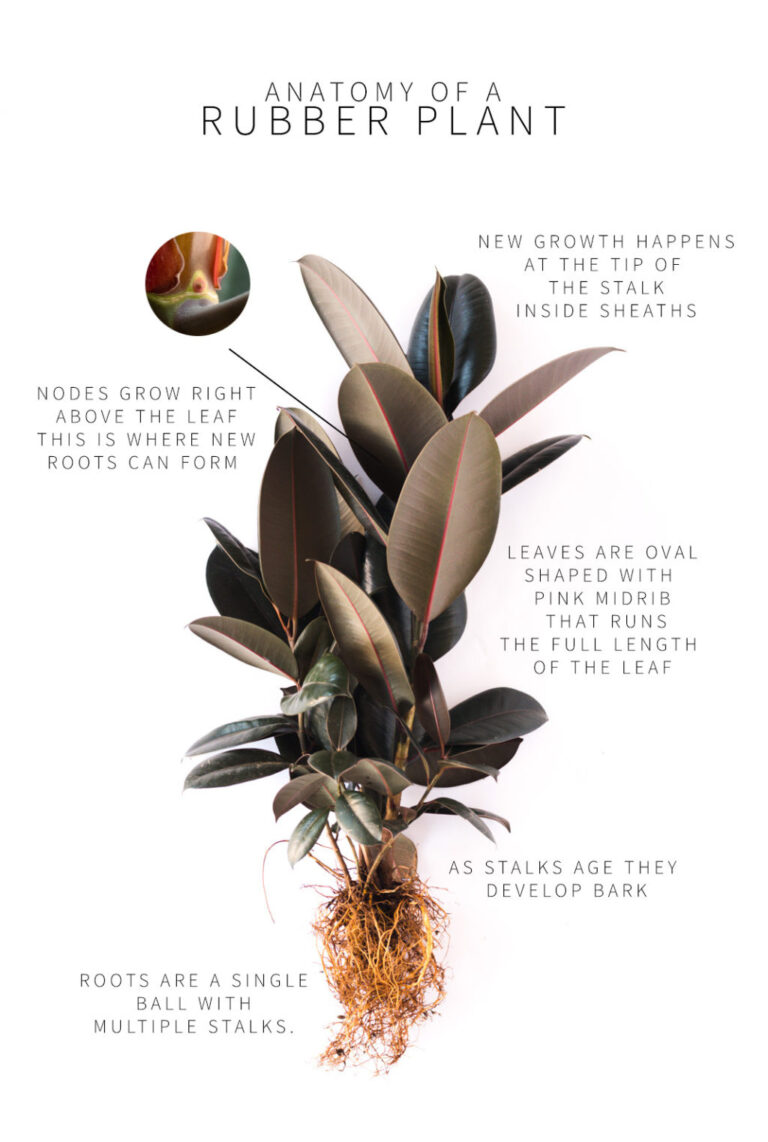
Propagation in water is a straightforward method that many gardeners find appealing. To get started, you’ll need a cutting from your rubber plant. Select a healthy stem and make a diagonal cut just above a leaf node. Using a clear vase or jar filled with room temperature water, place the cutting with the cut end submerged (Life Love Larson).
Roots generally form within a month, but it may take several months before the plant is ready for potting. Regularly change the water to prevent stagnation and monitor the root development closely.
| Steps | Description |
|---|---|
| 1 | Select a healthy stem and make a diagonal cut above a leaf node |
| 2 | Place the cutting in a clear jar with room temperature water |
| 3 | Monitor and change the water regularly |
| 4 | Wait several months for robust root development |
Once the roots are sufficiently developed, transition your rubber plant to a suitable potting soil.
Air Layering and Node Cuttings
Air layering is another effective method for propagating rubber plants. This technique involves encouraging root growth on an existing stem before separating it from the mother plant.
- Select a healthy stem and create a small wound by removing a strip of bark.
- Apply a rooting hormone to the exposed area.
- Wrap the wounded section with moist sphagnum moss and cover it with plastic wrap to maintain moisture.
- Secure the plastic with ties and check periodically for root development. Root growth typically takes a few months.
Alternatively, you can use node cuttings. Make a cut below a node and either place the stem in water or directly in soil for root growth.
| Method | Description |
|---|---|
| Air Layering | Remove bark, apply rooting hormone, wrap with moss, secure with plastic, monitor root growth |
| Node Cuttings | Cut below a node, place in water or soil for direct root growth |
For more insights on rubber plant propagation, including how to address issues like fallen leaves or brown edges, explore more in our gardening section. By following these propagation methods, you can expand your collection and keep your rubber plants healthy and thriving.
Troubleshooting Rubber Plants
Addressing Brown Leaf Edges
Brown leaf edges on your rubber plant can be troubling. This issue often stems from improper watering or insufficient humidity. Ensuring your plant receives the right amount of water is vital.
-
Watering: Overwatering or underwatering can both cause brown edges. Maintain a consistent watering schedule and only water when the top inch of soil is dry. Refer to our rubber plant watering guide for more detailed information.
Current Condition Recommended Action Overwatered Reduce watering frequency and ensure proper drainage Underwatered Increase watering and maintain consistent moisture levels -
Humidity: Rubber plants thrive in higher humidity. Regularly misting your plant or using a humidifier can help maintain adequate moisture in the air.
-
Light: Ensure your rubber plant is getting sufficient indirect light. Direct sunlight can scorch the leaves, while too little light can weaken the plant. For precise light needs, visit our rubber plant light requirements page.
Dealing with Variegated Rubber Plant Issues
Variegated rubber plants, such as the Tineke variety, often present unique challenges. One common issue is browning of the leaf edges, which is typically a sign of improper watering practices.
-
Watering Schedule: Variegated rubber plants are sensitive to both overwatering and underwatering. Ensure a balanced watering schedule that maintains soil moisture without waterlogging. See our page on rubber plant overwatered for more details on managing water issues.
-
Light Conditions: These plants require bright, indirect light to maintain their vibrant colors. Too much direct light can lead to scorch marks, while too little light can cause the plant to lose its variegation. More details are available on our Tineke rubber tree care page.
-
Nutrient Requirements: Variegated rubber plants may require additional nutrients to sustain their unique foliage. Using a balanced, slow-release fertilizer every few months can ensure they get the nutrients needed. Find out more on rubber plant fertilizer.
By understanding these common issues and referring to our helpful guides, you can troubleshoot and maintain the health of your rubber plant. For further tips, explore our resources on rubber plant leaves curling and rubber plant brown spots.
Transplanting and Recovery
Recovery Timeline for Newly Planted Trees
The recovery period for newly transplanted rubber plants can vary based on several factors such as soil conditions, climate, and care provided. A helpful guideline to follow is the Sleep…Creep…Leap rule, indicating the progress over the first three years of transplanting.
Sleep Year (First Year)
- The plant focuses on establishing a root system.
- Limited above-ground growth.
Creep Year (Second Year)
- Development of a decent root system.
- Noticeable new growth.
Leap Year (Third Year)
- Vigorous growth supporting additional root formation.
- Full establishment and robust development.
| Year | Growth Stage | Focus |
|---|---|---|
| First Year | Sleep | Root establishment |
| Second Year | Creep | New growth, root system development |
| Third Year | Leap | Vigorous growth, full establishment |
Source: Quora
Tips for Quick Tree Recovery
To ensure your rubber plant recovers quickly and thrives after transplanting, follow these tips:
-
Adequate Watering: Ensure consistent moisture without overwatering. Refer to rubber plant watering for detailed guidance.
-
Avoid Immediate Fertilization: Allow the plant to settle in its new environment before applying fertilizers. This prevents potential stress and nutrient burn.
-
Protection from Extreme Weather: Provide shelter from harsh conditions such as strong winds and direct sunlight. For more on the light requirements, check rubber plant light requirements.
-
Remove Supports within the First Year: Allow the tree to sway naturally to develop strength.
-
Planting Depth: Ensure the rubber plant is planted slightly higher rather than too deep. This helps in avoiding waterlogging and root rot. More insights on soil types can be found at rubber plant soil.
-
Remove Burlap and Amendments: Free the roots from any burlap material and avoid soil amendments to help the plant adapt to its new location.
By following these tips and the Sleep…Creep…Leap rule, your rubber plant will have a strong foundation for healthy growth. For more details on propagation and care techniques, visit sections on rubber plant propagation in water and other relevant rubber plant care tips within the blog.


